지난 포스팅에선 간단히 오브젝트와 컨테이너를 이용해서 배치하고 이벤트 처리를 하는 예제를 해봤습니다.
[Qt] QML UI 구성하기(1)
지난 포스팅에서 Qt Quick Application 프로젝트를 생성하는 부분까지 포스팅했습니다. [Qt] Qt Quick Application 시작하기 기존에 Qt Widget을 이용하여 UI를 구성하는 방법 말고도 Qml을 이용하여 UI를 구성하
1d1cblog.tistory.com
이번에는 State와 Property 등에 대해 알아보려고 합니다.
State는 Transition이라는 개념과 같이 나오는데 스위치를 예를 들자면 스위치는 ON/OFF State가 있고 ON/OFF를 할때마다 설정한 값이 바뀌게 되는데 이에 대한 행동이나 작업을 Trasition이라고 합니다.
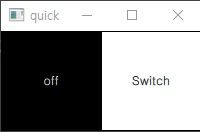
왼쪽에는 램프가 있고 오른쪽에 스위치를 하나 두었습니다. 스위치를 클릭하면 램프의 상태가 바뀌고 램프는 상태에 따라 Text와 색상이 바뀌께 됩니다.

import QtQuick 2.15
import QtQuick.Window 2.15

Window {
    width: 200
    height: 100
    visible: true

    Row {
        width:200
        height:100
        Rectangle {
            id:lamp
            width:100
            height:100
            border.color: "black"
            Text {
                id: lampText
            }

            state: "off"

            states: [
                State {
                    name: "on"
                    PropertyChanges {
                        target: lamp
                        color:"yellow"
                    }
                    PropertyChanges {
                        target: lampText
                        text:"on"
                        horizontalAlignment: Text.AlignHCenter
                        verticalAlignment: Text.AlignVCenter
                        color:"black"
                    }
                },
                State {
                    name: "off"
                    PropertyChanges {
                        target: lamp
                        color:"black"
                    }
                    PropertyChanges {
                        target: lampText
                        text:"off"
                        horizontalAlignment: Text.AlignHCenter
                        verticalAlignment: Text.AlignVCenter
                        color:"white"
                    }
                }
            ]
        }

        Rectangle {
            id:swit
            width:100
            height:100
            border.color: "black"

            MouseArea {
                anchors.fill: parent
                onClicked: {
                    lamp.state == "on" ? lamp.state = "off" : lamp.state = "on";
                }
            }
        }
    }
}
이 때 on state에서 off state로 이동할 때 처럼 State 간 변화가 있을 때의 행동을 Transitions이라고 합니다.
import QtQuick 2.15
import QtQuick.Window 2.15

Window {
    width: 200
    height: 100
    visible: true

    Row {
        width:200
        height:100
        Rectangle {
            id:lamp
            width:100
            height:100
            border.color: "black"
            Text {
                id: lampText
                width: parent.width
                height: parent.height
                horizontalAlignment: Text.AlignHCenter
                verticalAlignment: Text.AlignVCenter
            }

            state: "off"

            states: [
                State {
                    name: "on"
                    PropertyChanges {
                        target: lamp
                        color:"yellow"
                    }
                    PropertyChanges {
                        target: lampText
                        text:"on"
                        horizontalAlignment: Text.AlignHCenter
                        verticalAlignment: Text.AlignVCenter
                        color:"black"
                    }
                },
                State {
                    name: "off"
                    PropertyChanges {
                        target: lamp
                        color:"black"
                    }
                    PropertyChanges {
                        target: lampText
                        text:"off"
                        horizontalAlignment: Text.AlignHCenter
                        verticalAlignment: Text.AlignVCenter
                        color:"white"
                    }
                }
            ]

            transitions: [
                Transition {
                    from: "off"
                    to: "on"
                    ColorAnimation { duration : 1000 }
                }
            ]
        }

        Rectangle {
            id:swit
            width:100
            height:100
            border.color: "black"
            Text {
                text: "Switch"
                width: parent.width
                height: parent.height
                horizontalAlignment: Text.AlignHCenter
                verticalAlignment: Text.AlignVCenter
            }

            MouseArea {
                anchors.fill: parent
                onClicked: {
                    lamp.state == "on" ? lamp.state = "off" : lamp.state = "on";
                }
            }
        }
    }
}
위 코드에서 off->on으로 상태가 변경될 때는 Color 변경에 대해 Animation을 적용했습니다.
Qt에서 List나 Table 같은 데이터를 표현하기 위해서 Model 부분과 View 부를 제공합니다. 아래 그림을 보면 Model은 Data를 읽어 담아놓는 Container입니다. View는 Model로부터 읽어온 데이터를 표시하거나 핸들링하게 해줍니다.
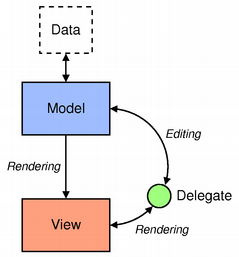
먼저 List입니다. List도 마찬가지로 Model과 View로 데이터를 관리/표시 하며 Delegate를 통해 표시할 데이터의 Style을 꾸며줄 수 있습니다.
import QtQuick 2.15
import QtQuick.Window 2.15

Window {
    width: 300
    height: 100
    visible: true

    ListModel {
        id:nameModel
        ListElement { name: "park" }
        ListElement { name: "kim" }
        ListElement { name: "lee" }
    } // 데이터를 담는 Model

    Component {
        id: nameDelegate
        Text {
            text : name
            font.pixelSize: 20
        }
    } // 데이터를 표현하는 Style

    ListView {
        anchors.fill: parent
        model : nameModel
        delegate: nameDelegate
    } // 데이터를 보여주는 View
}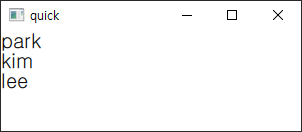
데이터를 변경하고 싶을 땐 Model을 Style을 변경하고 싶을 땐 Component(Delegate)를 실제 표시하는 오브젝트를 변경하고 싶을 때는 View를 수정하시면 됩니다.
Delegate는 한 데이터(Element)에 대해 꾸며주는 Style라고 생각하면 좋습니다. 위 예제에서 Element의 데이터가 추가되고 이 추가된 데이터를 표현할 Style을 더 추가해보겠습니다.
import QtQuick 2.15
import QtQuick.Window 2.15

Window {
    width: 300
    height: nameModel.count * 50
    visible: true
    id:windows

    ListModel {
        id:nameModel
        ListElement {
            name: "park"
            age : 20
        }
        ListElement {
            name: "kim"
            age : 25
        }
        ListElement {
            name: "lee"
            age : 30
        }
    } // 데이터를 담는 Model

    Component {
        id: nameDelegate
        Rectangle {
            width : windows.width
            height : windows.height/nameModel.count
            border.color: "black"
            border.width: 1

            Text {
                anchors.fill: parent
                text: "name : " + name + "\n" + "age : " + age;
                verticalAlignment: Text.AlignVCenter
                anchors.leftMargin: 10
            }
        }
    } // 데이터를 표현하는 Style

    ListView {
        anchors.fill: parent
        model : nameModel
        delegate: nameDelegate
    } // 데이터를 보여주는 View
}
여기에 리스트에 데이터를 추가하고 삭제하는 오브젝트도 넣어보겠습니다.
먼저 추가하는 코드입니다. 아래 코드에선 UI 크기 관리를 위해서 변수를 사용하였습니다. 변수는 property 키워드를 붙이고 자료형 + 변수명으로 사용 가능합니다.
import QtQuick 2.15
import QtQuick.Window 2.15


Window {
    property int listViewheight : nameModel.count * dataHeight;
    property int dataHeight : 50;
    property int inputUIHeight : 30;
    property int columnSpacing : 10;
    property int nCount : 5;

    width: 300
    height: listViewheight + inputUIHeight + columnSpacing;
    visible: true
    id:windows

    ListModel {
        id:nameModel
        ListElement {
            name: "park"
            age : 20
        }
        ListElement {
            name: "kim"
            age : 25
        }
        ListElement {
            name: "lee"
            age : 30
        }
    } // 데이터를 담는 Model

    Component {
        id: nameDelegate
        Rectangle {
            width : windows.width
            height : dataHeight
            border.color: "black"
            border.width: 1

            Text {
                anchors.fill: parent
                text: "name : " + name + "\n" + "age : " + age;
                verticalAlignment: Text.AlignVCenter
                anchors.leftMargin: 10
            }
        }
    } // 데이터를 표현하는 Style


    Column {
        spacing : columnSpacing
        width : parent.width
        height : parent.height
        ListView {
            width : parent.width
            height : listViewheight
            model : nameModel
            delegate: nameDelegate
        } // 데이터를 보여주는 View

        Row {

            width : parent.width
            height: inputUIHeight

            Rectangle {
                border.width: 1
                width : parent.width/nCount
                height : parent.height
                Text {
                    anchors.fill: parent
                    horizontalAlignment: Text.AlignHCenter
                    verticalAlignment: Text.AlignVCenter
                    text : "name"
                }
            }

            Rectangle {
                width : parent.width/nCount
                height : parent.height
                border.color: "black"
                border.width: 1
                TextInput {
                    id:nameInput
                    anchors.fill: parent
                    horizontalAlignment: Text.AlignHCenter
                    verticalAlignment: Text.AlignVCenter
                    onFocusChanged: {
                        focus? parent.color = "deepskyblue" : parent.color = "white"
                    }
                }
            }

            Rectangle {
                border.width: 1
                width : parent.width/nCount
                height : parent.height
                Text {
                    anchors.fill: parent
                    horizontalAlignment: Text.AlignHCenter
                    verticalAlignment: Text.AlignVCenter
                    text : "age"
                }
            }
            Rectangle {
                width : parent.width/nCount
                height : parent.height
                border.color: "black"
                border.width: 1
                TextInput {
                    id:ageInput
                    anchors.fill: parent
                    horizontalAlignment: Text.AlignHCenter
                    verticalAlignment: Text.AlignVCenter
                    onFocusChanged: {
                        focus? parent.color = "deepskyblue" : parent.color = "white"
                    }
                }
            }
            Rectangle {
                width : parent.width/nCount
                height : parent.height
                color: "gray"
                border.width: 1

                Text {
                    anchors.fill: parent
                    horizontalAlignment: Text.AlignHCenter
                    verticalAlignment: Text.AlignVCenter
                    text : "input"
                }
                MouseArea {
                    anchors.fill: parent
                    onClicked: {
                        nameModel.append({ name: nameInput.text,
                                           age : parseInt(ageInput.text)
                                        })
                        nameInput.text = ""
                        ageInput.text = ""
                        nameInput.focus = false
                        ageInput.focus = false
                    }
                }
            }
        }
    }
}
TextInput이 적용된 Rectangle을 클릭할 시 Focus가 들어가고 그에 따라 Color가 변경됩니다. 데이터를 입력 후 Input 버튼을 누르게 되면 해당 데이터가 리스트에 추가가 됩니다.
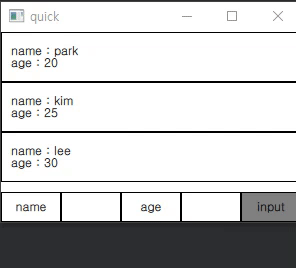
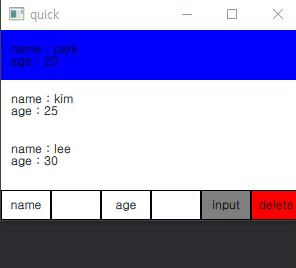
다음은 삭제 처리입니다. 삭제를 위해서 클릭한 아이템을 지우는 방식으로 진행했습니다. 어떤 아이템이 클릭되었는지 확인하기 위해서 listView에 highlight component도 추가하였습니다.
import QtQuick 2.15
import QtQuick.Window 2.15


Window {
    property int listViewheight : nameModel.count * dataHeight;
    property int dataHeight : 50;
    property int inputUIHeight : 30;
    property int columnSpacing : 10;
    property int nCount : 6;

    width: 300
    height: listViewheight + inputUIHeight + columnSpacing;
    visible: true
    id:windows

    ListModel {
        id:nameModel
        ListElement {
            name: "park"
            age : 20
        }
        ListElement {
            name: "kim"
            age : 25
        }
        ListElement {
            name: "lee"
            age : 30
        }
    } // 데이터를 담는 Model

    Component {
         id: nameDelegate
         Item {
             width : windows.width
             height : dataHeight

             Text {
                 anchors.fill: parent
                 text: "name : " + name + "\n" + "age : " + age;
                 verticalAlignment: Text.AlignVCenter
                 anchors.leftMargin: 10
             }
             MouseArea {
                 anchors.fill: parent
                 onClicked: nameList.currentIndex = index
             }
         }
     } // 데이터를 표현하는 Style

    Component {
        id:listHighLight
        Rectangle{
            color : "blue"
        }
    } // Highlight

    Column {
        spacing : columnSpacing
        width : parent.width
        height : parent.height
        ListView {
            id : nameList
            width : parent.width
            height : listViewheight
            model : nameModel
            delegate: nameDelegate
            highlight: listHighLight
        } // 데이터를 보여주는 View

        Row {
            width : parent.width
            height: inputUIHeight

            Rectangle {
                border.width: 1
                width : parent.width/nCount
                height : parent.height
                Text {
                    anchors.fill: parent
                    horizontalAlignment: Text.AlignHCenter
                    verticalAlignment: Text.AlignVCenter
                    text : "name"
                }
            }

            Rectangle {
                width : parent.width/nCount
                height : parent.height
                border.color: "black"
                border.width: 1
                TextInput {
                    id:nameInput
                    anchors.fill: parent
                    horizontalAlignment: Text.AlignHCenter
                    verticalAlignment: Text.AlignVCenter
                    onFocusChanged: {
                        focus? parent.color = "deepskyblue" : parent.color = "white"
                    }
                }
            }

            Rectangle {
                border.width: 1
                width : parent.width/nCount
                height : parent.height
                Text {
                    anchors.fill: parent
                    horizontalAlignment: Text.AlignHCenter
                    verticalAlignment: Text.AlignVCenter
                    text : "age"
                }
            }
            Rectangle {
                width : parent.width/nCount
                height : parent.height
                border.color: "black"
                border.width: 1
                TextInput {
                    id:ageInput
                    anchors.fill: parent
                    horizontalAlignment: Text.AlignHCenter
                    verticalAlignment: Text.AlignVCenter
                    onFocusChanged: {
                        focus? parent.color = "deepskyblue" : parent.color = "white"
                    }
                }
            }
            Rectangle {
                width : parent.width/nCount
                height : parent.height
                color: "gray"
                border.width: 1

                Text {
                    anchors.fill: parent
                    horizontalAlignment: Text.AlignHCenter
                    verticalAlignment: Text.AlignVCenter
                    text : "input"
                }
                MouseArea {
                    anchors.fill: parent
                    onClicked: {
                        nameModel.append({ name: nameInput.text,
                                           age : parseInt(ageInput.text)
                                        })
                        nameInput.text = ""
                        ageInput.text = ""
                        nameInput.focus = false
                        ageInput.focus = false
                    }
                }
            }

            Rectangle {
                width : parent.width/nCount
                height : parent.height
                color: "red"
                border.width: 1

                Text {
                    anchors.fill: parent
                    horizontalAlignment: Text.AlignHCenter
                    verticalAlignment: Text.AlignVCenter
                    text : "delete"
                }
                MouseArea {
                    anchors.fill: parent
                    onClicked: {
                        if ( nameModel.count > 0 ) {
                            nameModel.remove(nameList.currentIndex);
                            nameList.currentIndex = -1
                        }
                    }
                }
            }
        }
    }
}
Delegate에 Rectangle 오브젝트를 사용하면 highlight가 제대로 적용되지 않아 Item 오브젝트로 변경하였습니다.
'Programming > Qt' 카테고리의 다른 글
| [Qt] QML(4) - QML/C++ 통합하기(Q_PROPERTY, Q_INVOKABLE, SIGNAL) (0) | 2023.04.13 |
|---|---|
| [Qt] QML(3) - Control Object (0) | 2023.04.12 |
| [Qt] QML(1) - Object, Layout, Event (0) | 2023.04.10 |
| [Qt] windeployqt 사용하기 (0) | 2023.04.07 |
| [Qt] QTime to Seconds / Second to QTime (0) | 2023.03.22 |