Qt Widget Application Project에서는 ui 파일에서 ui를 배치하고 c++ 코드에서 그 ui에 접근하여 수정하기도 했습니다. 그리고 c++ 코드에서 동적으로 UI를 배치할 수도 있었습니다.

Qt Quick에서도 C++과 QML 사이에 주고받을 수 있는 방법이 여러 존재하는데 그에 대해 알아보려 합니다. 간단히 계산기 예제를 통해서 알아보겠습니다.
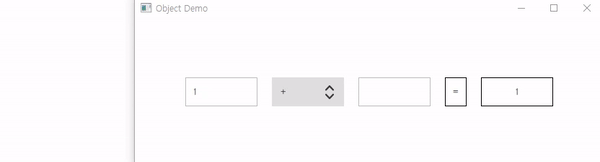
먼저 property를 이용한 방법입니다. qml 파일을 간단히 두 숫자를 계산하고 결과를 보여주는 ui로 구성하였습니다.
import QtQuick 2.15
import QtQuick.Window 2.15
import QtQuick.Controls 2.15

Window {
    visible: true
    width : 650
    height: 200
    title: qsTr("Object Demo")
    property int nwidth : 100;

    Item {
        anchors.fill: parent
        Row {
            anchors.centerIn: parent
            spacing : 20
            TextField {
                id : number1
                width : nwidth
                validator: IntValidator {}
                onTextChanged: {
                    PropertyControl.number1 = parseInt(number1.text)
                }
            }
            ComboBox {
                id : combo
                width : nwidth
                model : ["+","-","x","/"]

                onCurrentTextChanged: {
                    PropertyControl.sOP = combo.currentText
                }
            }
            TextField {
                id : number2
                width : nwidth
                validator: IntValidator {}
                onTextChanged: {
                    PropertyControl.number2 = parseInt(number2.text)
                }
            }
            Rectangle {
                width : 30
                height : number1.height
                border.width: 1
                Label {
                    anchors.fill: parent
                    text:" = "
                    horizontalAlignment: Text.AlignHCenter
                    verticalAlignment: Text.AlignVCenter
                }
            }
            Rectangle {
                width : nwidth
                height : number1.height
                border.width: 1
                Label {
                    anchors.fill: parent
                    text : PropertyControl.result
                    horizontalAlignment: Text.AlignHCenter
                    verticalAlignment: Text.AlignVCenter
                }
            }
        }
    }
}
QObject를 상속받는 객체를 하나 만들어줍니다. 이 객체를 통해 Property를 관리하고 qml에서 Propertycontrol 객체의 데이터를 쓰고 읽을 수 있습니다.
#ifndef PROPERTYCONTROL_H
#define PROPERTYCONTROL_H

#include <QObject>

class PropertyControl : public QObject
{
    Q_OBJECT
    Q_PROPERTY(int number1 WRITE SetNumber1)
    Q_PROPERTY(int number2 WRITE SetNumber2)
    Q_PROPERTY(QString sOP WRITE SetOp)
    Q_PROPERTY(int result READ GetResult NOTIFY ResultChanged)

public:
    explicit PropertyControl(QObject *parent = nullptr);

    void SetNumber1(int& nNum);
    void SetNumber2(int& nNum);
    void SetOp(QString& sOP);

    int GetResult();
signals:
    void ResultChanged();

private:
    int m_nResult;
    int m_nNumber1;
    int m_nNumber2;
    QString m_sOP;
};

#endif // PROPERTYCONTROL_H#include "PropertyControl.h"
#include <QDebug>
PropertyControl::PropertyControl(QObject *parent)
: QObject{parent}
, m_nResult(0)
, m_nNumber1(0)
, m_nNumber2(0)
, m_sOP("")
{
}
void PropertyControl::SetNumber1(int& nNum) {
m_nNumber1 = nNum;
emit ResultChanged();
}
void PropertyControl::SetNumber2(int& nNum) {
m_nNumber2 = nNum;
emit ResultChanged();
}
void PropertyControl::SetOp(QString& sOP) {
m_sOP = sOP;
emit ResultChanged();
}
int PropertyControl::GetResult() {
if ( m_sOP == "+" ) {
m_nResult = m_nNumber1 + m_nNumber2;
} else if ( m_sOP == "-" ) {
m_nResult = m_nNumber1 - m_nNumber2;
} else if ( m_sOP == "x" ) {
m_nResult = m_nNumber1 * m_nNumber2;
} else if ( m_sOP == "/" ) {
if ( m_nNumber2 == 0 ) { return 0; }
m_nResult = m_nNumber1 / m_nNumber2;
} else {
return 0;
}
return m_nResult;
}그리고 이 Propertycontrol 객체를 생성 후 engine의 rootContext에 등록해 줍니다.
#include <QGuiApplication>
#include <QQmlApplicationEngine>
#include <QQmlContext>
#include "PropertyControl.h"

int main(int argc, char *argv[])
{
#if QT_VERSION < QT_VERSION_CHECK(6, 0, 0)
    QCoreApplication::setAttribute(Qt::AA_EnableHighDpiScaling);
#endif
    QGuiApplication app(argc, argv);

    QQmlApplicationEngine engine;
    PropertyControl control;
    engine.rootContext()->setContextProperty("PropertyControl",&control);

    const QUrl url(QStringLiteral("qrc:/main.qml"));
    QObject::connect(&engine, &QQmlApplicationEngine::objectCreated, &app,
        [url](QObject *obj, const QUrl &objUrl) {
            if (!obj && url == objUrl)
                QCoreApplication::exit(-1);
        }
    , Qt::QueuedConnection);

    engine.load(url);
    return app.exec();
}
위 코드를 하나씩 보겠습니다. Propertycontrol 객체에는 Q_OBJECT가 선언되어 있고 그 밑으로 qml과 c++간 주고받을 property가 선언되어 있습니다. qml에서 해당 property에 값을 넣을 때는 WRITE 뒤에 명시된 함수가 호출되고 property의 값을 읽을 때는 READ 함수를 이용합니다.
Q_OBJECT
Q_PROPERTY(int number1 WRITE SetNumber1)
Q_PROPERTY(int number2 WRITE SetNumber2)
Q_PROPERTY(QString sOP WRITE SetOp)
Q_PROPERTY(int result READ GetResult NOTIFY ResultChanged)
아래 오브젝트를 보면 TextField에서 값이 변경되면 main에서 전달된 Propertycontrol 객체의 number1에 값을 넣어주고 있습니다.
TextField {
    id : inputNumber1
    width : nwidth
    validator: IntValidator {}
    onTextChanged: {
        PropertyControl.number1 = parseInt(inputNumber1.text)
    }
}engine.rootContext()->setContextProperty("PropertyControl",&control);이때 Q_PROPERTY에 number1의 WRITE 함수를 SetNumber1으로 등록했기 때문에 SetNumber1이 호출될 것입니다.
Q_PROPERTY(int number1 WRITE SetNumber1)

void PropertyControl::SetNumber1(int& nNum) {
    m_nNumber1 = nNum;
    qDebug() << "number1 Changed";
    emit ResultChanged();
}
이렇게 TextField와 Combobox는 WRITE 시에 해당 함수를 타게 됩니다.
계산 결과를 보여주는 result 변수는 Label에서 text로 지정해놓고 있습니다. 한번 Property 지정을 해놓고 다른 코드에서는 이 Label의 Text를 건드리지 않고 있습니다.
Rectangle {
    width : nwidth
    height : inputNumber1.height
    border.width: 1
    Label {
        anchors.fill: parent
        text : PropertyControl.result
        horizontalAlignment: Text.AlignHCenter
        verticalAlignment: Text.AlignVCenter
    }
}
이때 이 result를 READ 하고 있는 Q_PROPERTY에 등록된 NOTIFY signal을 이용해야 합니다. 위 코드에서 봤듯이 숫자나 연산자를 변경하였을 때 결과 값을 바로 경신할 수 있게 emit을 날려주고 있습니다.
Q_PROPERTY(int number1 WRITE SetNumber1)

void PropertyControl::SetNumber1(int& nNum) {
    m_nNumber1 = nNum;
    qDebug() << "number1 Changed";
    emit ResultChanged();
}
만약 이 Emit을 없앤다면 Label에 result에 대해 Read 하지 않아 갱신이 되지 않습니다.
qml에서 C++ 함수를 직접적으로 호출할 수 있습니다. C++의 객체에서 Q_INVOKABLE로 선언된 함수는 호출이 가능합니다.
Button {
    width : nwidth
    height : inputNumber1.height
    text : "QDebug"
    onClicked: {
        PropertyControl.showlogResult()
    }
}#ifndef PROPERTYCONTROL_H
#define PROPERTYCONTROL_H
#include <QObject>
class PropertyControl : public QObject
{
Q_OBJECT
Q_PROPERTY(int number1 WRITE SetNumber1)
Q_PROPERTY(int number2 WRITE SetNumber2)
Q_PROPERTY(QString sOP WRITE SetOp)
Q_PROPERTY(int result READ GetResult NOTIFY ResultChanged)
public:
explicit PropertyControl(QObject *parent = nullptr);
void SetNumber1(int& nNum);
void SetNumber2(int& nNum);
void SetOp(QString& sOP);
int GetResult();
Q_INVOKABLE void showlogResult()
{
qDebug() << "Result = " << m_nResult;
}
signals:
void ResultChanged();
private:
int m_nResult;
int m_nNumber1;
int m_nNumber2;
QString m_sOP;
};
#endif // PROPERTYCONTROL_H마지막으로 SIGNAL을 이용한 방법입니다. 오브젝트 안에 signal을 등록하고 버튼을 클릭했을 때 해당 signal을 발생하게 만들었습니다.
Item {
    id : item
    objectName: "item"
    anchors.fill: parent
    signal sigDebug();
    Button {
        width : nwidth
        height : inputNumber1.height
        text : "QDebug"
        onClicked: {
            item.sigDebug()
        }
    }
}
해당 Signal을 QObject를 상속받는 객체와 connect를 시켜줍니다.
{
	...

    QObject* pWindow = engine.rootObjects().value(0);
    QObject* pObject = pWindow->findChild<QObject*>("item");
    if ( pObject != NULL ) {
        QObject::connect(pObject, SIGNAL(sigDebug()),&control, SLOT(Slot_ShowDebug()));
    }

}#ifndef PROPERTYCONTROL_H
#define PROPERTYCONTROL_H
#include <QObject>
class PropertyControl : public QObject
{
Q_OBJECT
Q_PROPERTY(int number1 WRITE SetNumber1)
Q_PROPERTY(int number2 WRITE SetNumber2)
Q_PROPERTY(QString sOP WRITE SetOp)
Q_PROPERTY(int result READ GetResult NOTIFY ResultChanged)
public:
explicit PropertyControl(QObject *parent = nullptr);
void SetNumber1(int& nNum);
void SetNumber2(int& nNum);
void SetOp(QString& sOP);
int GetResult();
signals:
void ResultChanged();
public slots:
void Slot_ShowDebug()
{
qDebug() << m_nResult;
}
private:
int m_nResult;
int m_nNumber1;
int m_nNumber2;
QString m_sOP;
};
#endif // PROPERTYCONTROL_H'Programming > Qt' 카테고리의 다른 글
| [Qt] QML(6) - Loader, Binding, Connection (0) | 2023.04.18 |
|---|---|
| [Qt] QML(5) - TimeTimer 프로그램 만들기 (0) | 2023.04.17 |
| [Qt] QML(3) - Control Object (0) | 2023.04.12 |
| [Qt] QML(2) - State/Transition, ListView, Property (0) | 2023.04.12 |
| [Qt] QML(1) - Object, Layout, Event (0) | 2023.04.10 |
