하지만 이 함수를 사용하게 되면 바라보는 Handle(커널 오브젝트)가 Signaled 상태가 되는 지를 전달 받은 시간만큼 기다리는데 이때 Blocking 상태가 되게 됩니다. 이를 방지하기 위해 비동기 I/O와 같은 방식을 통해 해당 Handle에 대한 상태 체크를 대기하지 않고 다른 일을 처리할 수 있게 해줍니다.
우리가 template과 함께 typename 이라는 키워드를 사용하였습니다. 이 typename이라는 키워드는 템플릿 매개변수를 선언할 때 사용합니다. template <typename T> 처럼 사용하는 사람이 있고 template <class T> 로 사용하는 사람이 있는데 똑같이 동작합니다. typename이라는 키워드 자체를 타입이라고 명시를 시켜줄 때 사용할 수도 있습니다.
예를 들어 아래와 같이 코드를 작성했을 때 일반적인 상황에서는 전달받은 컨테이너가 가지고 있는 const_iterator 타입을 포인터 변수로 사용하는 코드가 됩니다. 하지만 만약에 전달받은 타입에 const_iterator라는 정적 변수가 있을 때에는 또 다른 의미를 가지게 됩니다. 그리고 x라는 전역 변수가 어딘가에 있다면 이 구문은 포인터 변수를 선언하는 코드가 아닌 단순 곱하기처럼 동작할 가능성을 지니게 됩니다.
템플릿으로 만들어진 클래스를 상속 받아 클래스를 하나 만들어 보겠습니다. Printer라는 클래스는 Test 변수를 하나 생성해서 printTest 함수를 호출합니다. 근데 이 Printer<T>를 상속받아 LogPrinter라는 클래스를 하나 더 만들고 이 안에서 print 함수를 호출하도록 하였습니다. 하지만 이대로 컴파일 시 에러가 나게 됩니다.
기본적으로 템플릿은 편의성과 확장성을 모두 만족할 수 있는 기법입니다. 예를 들어 매개변수로 전달받은 두 수를 더하는 함수를 만든다고 가정했을 때 매개변수는 정수형이 올 수도 실수형이 올 수도 있습니다. 이럴 때 함수 오버로딩을 통해 각 매개변수 타입에 대한 함수를 다중 정의할 수 있습니다.
intAdd(int a, int b);
doubleAdd(double a, double b);
만약 간단하지 않은 하나의 함수를 여러가지로 다중 정의했을 때 문제가 발생하는 경우 모든 함수를 고치거나 손봐야 하는 경우가 생깁니다. 이럴 경우 사용할 수 있는 것이 템플릿입니다. 템플릿은 아래와 같이 template이라는 키워드를 사용합니다. 이렇게 정의한 코드를 사용자가 호출하면 컴파일러에 의해 다중 정의 코드가 자동으로 만들어지게 됩니다.
데이터의 추가 삭제가 많은 경우에는 연결리스트를 사용하는게 더욱 효율적일 수 있지만 사용자가 임의로 연결리스트를 구현하기 위해서 노드를 구현하고 그를 위해 동적할당을 한다면 memory leak이 발생할 가능성이 큽니다. 이럴 때 사용할 수 있게 std::array와 마찬가지로 std::forward_list를 제공합니다.
std::forward_list는 기본적인 연결리스트 기능을 갖추고 있고 추가 기능을 제공합니다. std::forward_list에서 데이터를 삽입하기 위해서는 push_front()와 insert_after()를 사용합니다. push_front 함수는 연결리스트 가장 앞에 데이터를 삽입하고 insert_after 함수는 반복자를 이용해서 원하는 위치 뒤로 데이터를 삽입합니다.
#include<iostream>#include<forward_list>usingnamespace std;
voidprintFwdlist(std::forward_list<int>& list){
for ( int i : list ) {
cout << i << ' ';
} cout << endl;
}
intmain(int argc, char* argv[]){
std::forward_list<int> fwd_list = {1,2,3};
fwd_list.push_front(0);
printFwdlist(fwd_list);
auto it = fwd_list.begin();
fwd_list.insert_after(it, 5);
fwd_list.insert_after(++it, 7);
printFwdlist(fwd_list);
}
삭제의 경우에는 pop_front()와 erase_after()를 사용합니다. 삽입과 마찬가지로 각각 첫번째, 그리고 해당 위치 다음 데이터를 조작합니다. erase_after의 경우에는 두가지 형태가 제공되는데 그냥 반복자만 넘겨 해당 위치 다음의 데이터를 제거하는 것과 위치값을 2개를 넘겨 해당 범위의 데이터를 모두 삭제시키는 형태가 있습니다.
#include<iostream>#include<forward_list>usingnamespace std;
voidprintFwdlist(std::forward_list<int>& list){
for ( int i : list ) {
cout << i << ' ';
} cout << endl;
}
intmain(int argc, char* argv[]){
std::forward_list<int> fwd_list = {1,2,3,4,5,6,7,8};
fwd_list.pop_front();
printFwdlist(fwd_list);
auto it = fwd_list.begin();
fwd_list.erase_after(it);
printFwdlist(fwd_list);
fwd_list.erase_after(it, fwd_list.end());
printFwdlist(fwd_list);
}
위 함수 외에도 remove, remove_if 함수가 제공되는데 remove 함수는 매개변수 값이 std::forward_list 내에 존재할 경우 지워주게 되고 remove_if 함수는 람다함수를 매개변수로 넘겨 사용하며 함수 몸체에 등호 연산을 통해 해당 데이터를 지우게 됩니다.
#include<iostream>#include<forward_list>usingnamespace std;
voidprintFwdlist(std::forward_list<int>& list){
for ( int i : list ) {
cout << i << ' ';
} cout << endl;
}
intmain(int argc, char* argv[]){
std::forward_list<int> fwd_list = {1,2,3,4,5,6,7,8};
fwd_list.remove(1);
printFwdlist(fwd_list);
fwd_list.remove_if([](int n) { return n > 4; });
printFwdlist(fwd_list);
}
이 외에도 정렬을 위한 sort 함수, 역순으로 뒤집는 reverse 함수, 인접하는 중복 데이터를 제거하는 unique 함수 등이 있습니다.
#include<iostream>#include<forward_list>usingnamespace std;
voidprintFwdlist(std::forward_list<int>& list){
for ( int i : list ) {
cout << i << ' ';
} cout << endl;
}
intmain(int argc, char* argv[]){
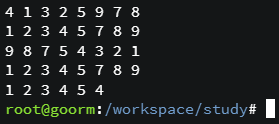
std::forward_list<int> fwd_list = {4,1,3,2,5,9,7,8};
printFwdlist(fwd_list);
fwd_list.sort(); // 오름차순 정렬printFwdlist(fwd_list);
fwd_list.sort(std::greater<int>()); // 내림차순 정렬printFwdlist(fwd_list);
fwd_list.reverse();
printFwdlist(fwd_list);
std::forward_list<int> fwd_list2 = {1,1,2,3,3,4,5,4};
fwd_list2.unique();
printFwdlist(fwd_list2);
}
std::foward_list에 존재하지 않는 기능이 추가된 연결 리스트가 std::list 입니다. std::list의 경우 이중연결리스트로 구현되어 있습니다. std::list에서는 임의의 위치에 데이터를 삽입/삭제할 때 _after가 빠진 함수 insert(), erase()를 사용하며 std::forward_list에서는 제공하지 않는 push_back(), pop_back()도 제공합니다.
#include<iostream>#include<list>usingnamespace std;
voidprintList(std::list<int>& list){
for ( int i : list ) {
cout << i << ' ';
} cout << endl;
}
intmain(int argc, char* argv[]){
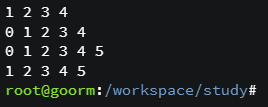
std::list<int> list = {1,2,3};
list.push_back(4);
printList(list);
list.insert(list.begin(), 0);
printList(list);
list.insert(list.end(), 5);
printList(list);
list.push_back(6);
list.pop_front();
list.pop_back();
printList(list);
}
위와 같이 사용할 경우 정적 배열의 경우 고정된 크기로 설정이 가능하고 인덱스를 넘어 참조하려 할 경우 Segmanatation fault가 발생합니다. 동적 배열의 경우 new에 대한 delete가 빠질 경우 그에 따른 메모리 누수(memory leak)가 발생할 수 있습니다.
이럴 때 C++ 스타일의 배열인 std::array를 사용하면 좋습니다. std::array를 사용할 경우 메모리도 자동으로 할당, 해제하여 사용하기에도 안전합니다.
array의 경우 아래처럼 template을 통해 타입을 지정할 수 있고 두 번째 인자로 크기를 상수로 넘겨주게 됩니다.
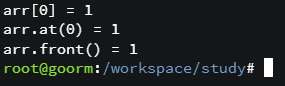
std::array를 사용하려면 #include<array>를 추가해주어야 합니다. 기본적으로 접근은 특정 인덱스에 접근하는 방법과 정해진 위치(앞, 뒤)에 접근하는 방법이 있는데 특정 인덱스에 접근하기 위해서는 기존처럼 [] 연산자를 사용하거나 at 함수를 사용할 수 있습니다. 혹은 정해진 위치를 접근하기 위해 front() 함수나 back() 함수를 통해 접근도 가능합니다.
만약에 인덱스 범위를 넘어서 참조하려 한다면 기존 배열의 경우에는 segmentation fault가 났겠지만 std::array는 좀 다릅니다. [] 연산자를 통해 접근할 경우 쓰레기 값이 출력되고 at을 통해 접근 시 std::out_of_range 에러가 납니다.
이렇게 되면 예외 처리를 통해 에러를 방지할 수 있습니다.
#include<iostream>#include<array>usingnamespace std;
intmain(int argc, char* argv[]){
std::array<int, 3> arr{1,2,3}; // 초기화try {
for ( int i =0; i <= 3; i++) {
cout << "arr.at(" << i << ") = " << arr.at(i) << endl;
}
} catch ( const std::out_of_range& e) {
cout << "out of range" << endl;
}
}
이 std::array를 매개변수로 던지는 방법은 const 참조형으로 넘기는 방법과 data 함수를 통해서 저장되어 있는 배열을 넘기는 방법이 있습니다.
#include<iostream>#include<array>usingnamespace std;
voidprint2constarg(const std::array<int,3>& arr){
for ( int i : arr ) {
cout << i;
}
cout << endl;
}
voidprint2data(constint* pArr, std::size_t size){
for (std::size_t i = 0; i < size; i++) {
cout << pArr[i] << ' ';
}
cout << endl;
}
intmain(int argc, char* argv[]){
std::array<int, 3> arr{1,2,3};
print2constarg(arr);
print2data(arr.data(), arr.size());
}
위에서 print2constarg의 매개변수 std::array의 크기를 고정시켰는데 만약에 크기가 다른 array를 받으면 에러가 발생합니다.
이것을 방지하기 위해서 변수 크기를 템플릿화 해서 사용한다면 다른 크기의 array도 사용이 가능해집니다. 이렇게 타입도 템플릿 매개변수로 지정할 수 있지만 타입이 기본 자료형이 아닌 경우에 기본 출력이 아닌 방법을 사용해야 할 수 있기 때문에 타입은 지정하는 게 안전하다고 생각합니다.
template <size_t T>
voidprint2constarg(const std::array<int,T>& arr){
for ( int i : arr ) {
cout << i;
}
cout << endl;
}
voidprint2data(constint* pArr, std::size_t size){
for (std::size_t i = 0; i < size; i++) {
cout << pArr[i] << ' ';
}
cout << endl;
}
intmain(int argc, char* argv[]){
std::array<int, 11> arr{1,2,3};
print2constarg(arr);
print2data(arr.data(), arr.size());
}
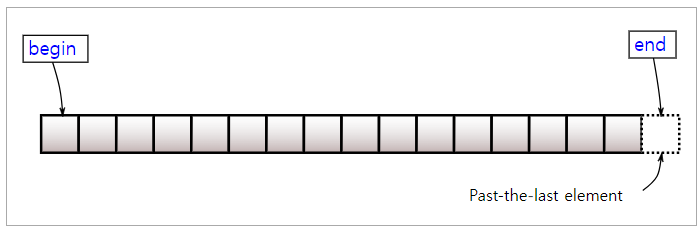
마지막으로 반복자를 통해 요소를 접근하는 방법입니다. begin은 첫 번째 원소를 가리키는 반복자를 반환, end는 마지막 원소의 다음을 가리키는 반복자를 반환합니다.
#include<iostream>#include<array>usingnamespace std;
template <size_t T>
voidprint2constarg(const std::array<int,T>& arr){
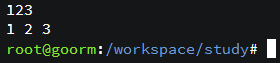
for ( auto i : arr ) {
cout << i;
}
cout << endl;
for ( auto it = arr.begin(); it!= arr.end(); ++it ) {
cout << *it;
}
cout << endl;
}
intmain(int argc, char* argv[]){
std::array<int, 3> arr{1,2,3};
print2constarg(arr);
}
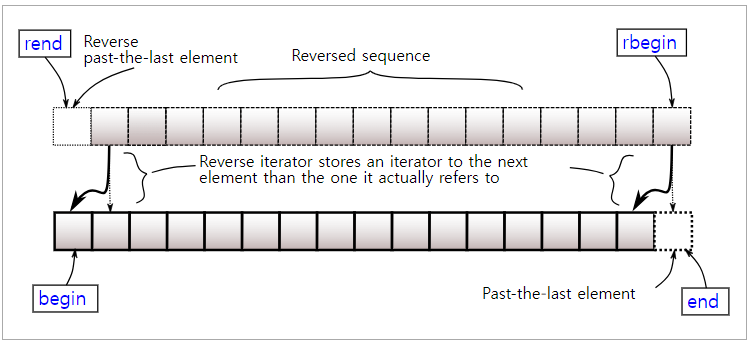
여기에 const_iterator를 사용할 수 있는 cbegin, cend 그리고 reverse_iterator를 사용하는 rbegin, rend가 있지만 반복자에 const가 붙는 것, begin/end가 반대인 것이 생각하면 됩니다.
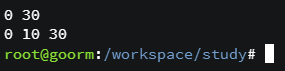
vector는 크기가 가변이기 때문에 추가/삭제도 가능한데 추가를 위해 insert(), push_back()를 사용합니다. insert의 경우 추가를 원하는 위치를 같이 넘겨 원하는 위치에 값을 추가하고 push_back의 경우에는 맨 뒤에 요소를 추가합니다.
#include<iostream>#include<vector>usingnamespace std;
intmain(int argc, char* argv[]){
std::vector<int> vecInt;
vecInt.push_back(0);
vecInt.push_back(30);
for ( int i : vecInt ) {
cout << i << ' ';
} cout << endl;
vecInt.insert(vecInt.begin()+1,10);
for ( int i : vecInt ) {
cout << i << ' ';
} cout << endl;
}
추가 시에 벡터가 가질 수 있는 capacity를 체크 후 모자르다면 capacity를 늘리고 추가합니다. capacity는 vector가 수용할 수 있는 요소 개수 정도라고 생각하면 되고 크기(size)는 현재 vector가 가지고 있는 요소 개수라고 생각하면 됩니다.
push_back의 경우에는 단순히 뒤에 추가하는 작업이기 때문에 O(1)의 시간 복잡도를 나타내지만, insert의 경우 특정 위치에 요소를 추가하면 요소들을 복사/이동 해야하기 때문에 O(n)의 시간 복잡도를 나타냅니다. 그렇기 때문에 추가/삭제가 빈번히 일어나는 경우 vector 자료구조를 사용하는게 오히려 독이될 수 있습니다.
추가에 있어 emplace 함수가 있는데 이 함수는 객체를 요소로 추가할 때 임시 객체를 생성할 필요 없이 사용 가능하게 해주는 함수입니다. 이렇게 봤을 땐 무조건 emplace가 좋을거 같지만 형 변환 등에 취약할 수 있습니다. 관련해서 정리가 잘 되어 있는 블로그 포스팅 링크 남겨둡니다.
Qt Console Application을 만들고 Run을 시켰는데 Console 창이 안뜨고 아래 Application Output Pannel에 결과가 나오는 경우가 있습니다.
QT -= gui
CONFIG += c++17 console
CONFIG -= app_bundle
# You can make your code fail to compile if it uses deprecated APIs.# In order to do so, uncomment the following line.#DEFINES += QT_DISABLE_DEPRECATED_BEFORE=0x060000 # disables all the APIs deprecated before Qt 6.0.0
SOURCES += \
main.cpp
# Default rules for deployment.
qnx: target.path = /tmp/$${TARGET}/bin
else: unix:!android: target.path = /opt/$${TARGET}/bin
!isEmpty(target.path): INSTALLS += target
보안이나 특정 상황에 의해서 외부망에 연결하지 않는 내부 서버들이 있습니다. 이럴 경우 시간 동기화에 문제가 발생할 수 있는데 윈도우 NTP 서버 / 클라이언트 기능을 이용하여 위 문제를 해결할 수 있습니다. 하지만 이 해결 방법은 하나의 인터넷에 연결된 서버가 같은 망에 적어도 1개는 존재해야 가능합니다.
구성은 아래와 같습니다. 외부망과 연결된 서버는 time.windows.com 같은 Time Server와 시간을 동기화 해주고 그 동기화 된 시간을 내부서버가 Windows NTP 기능을 이용해 다시 동기화 합니다.
먼저 외부와 연결된 서버에 설정을 해줍니다.
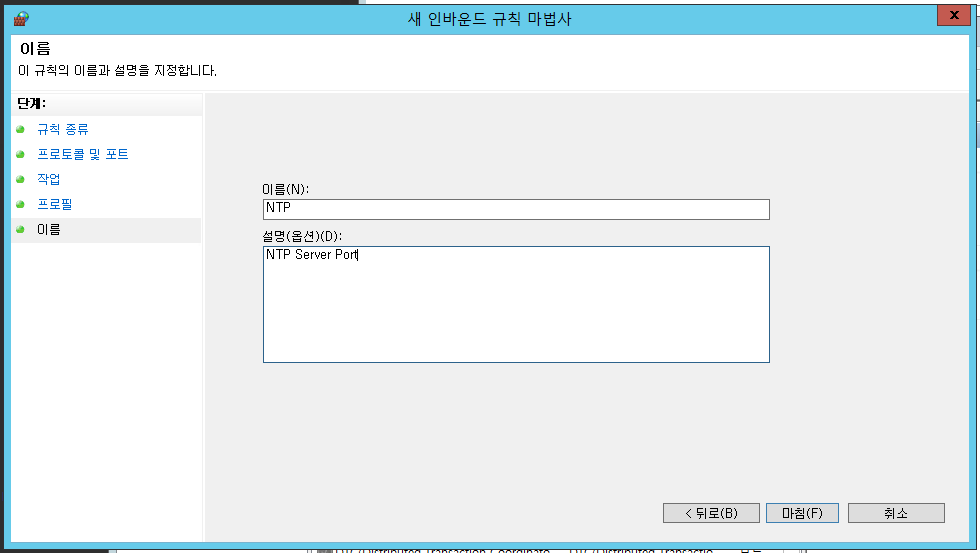
[Windows 방화벽] > [고급 설정] > [인바인드 규칙] > [새 규칙] 으로 들어가 규칙을 추가합니다.
NTP의 경우 123번 포트 사용합니다.
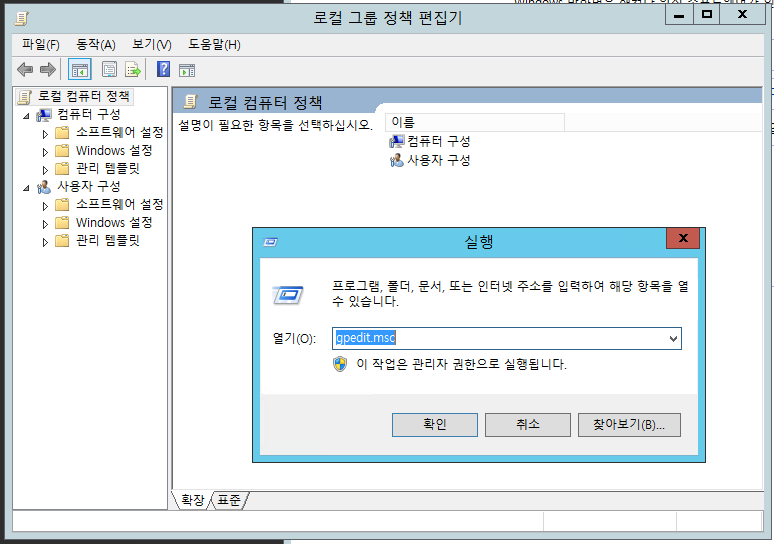
[Win] + [R] 으로 실행을 실행해서 gpedit.msc를 입력해 로컬 그룹 정책 편집기를 실행합니다.
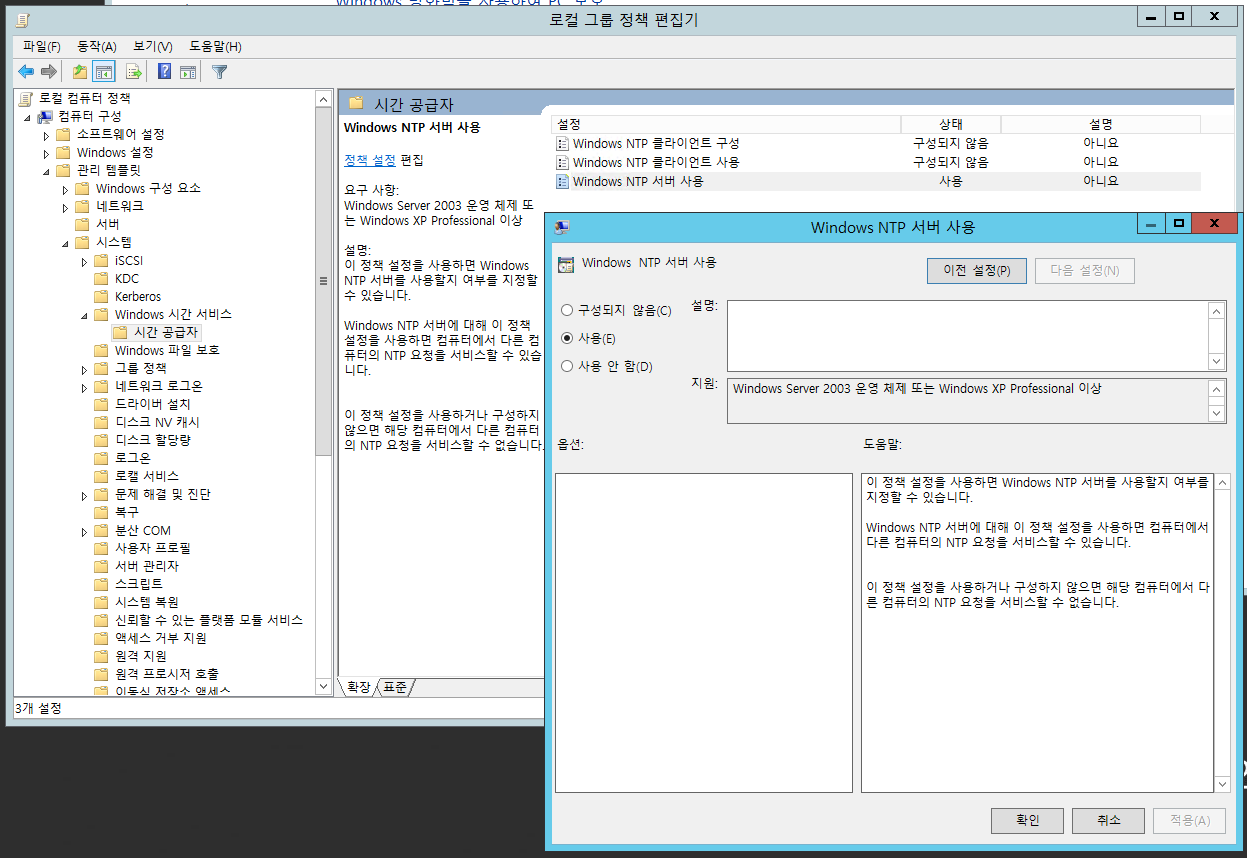
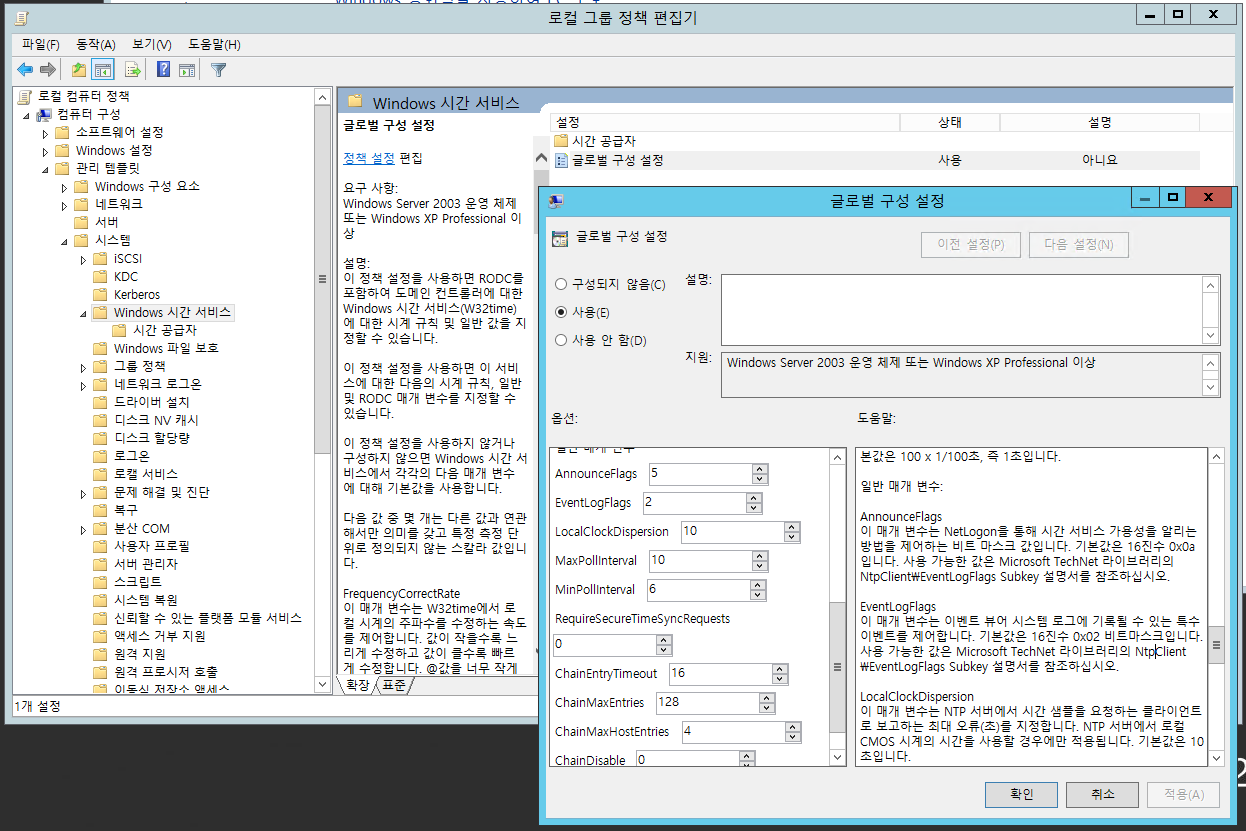
[Windows 시간 서비스] > [글로벌 구성 설정] 에서 AnnounceFlags를 5로 설정합니다.
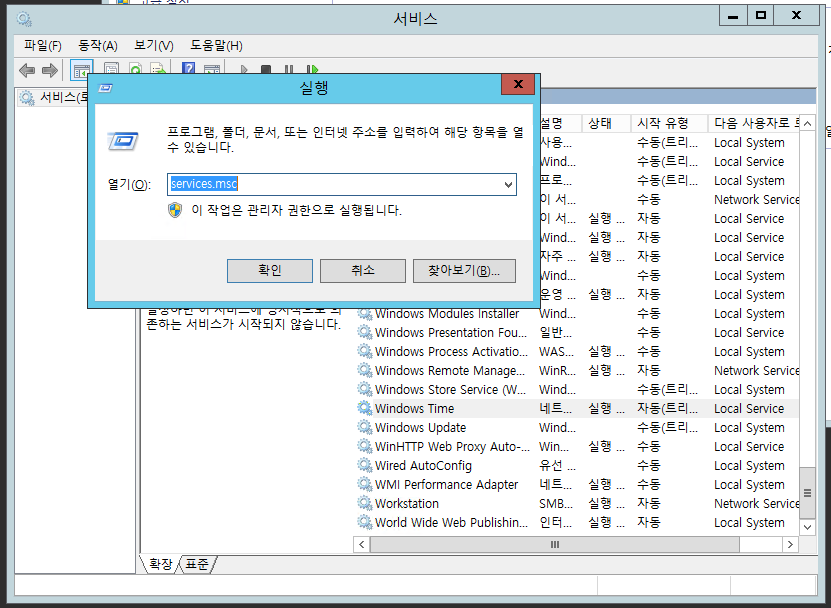
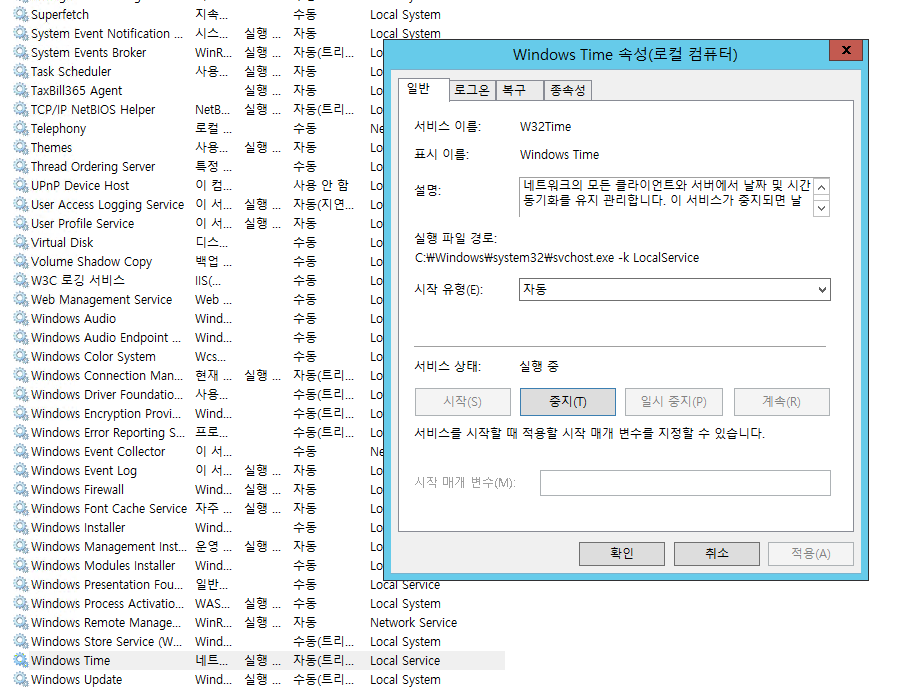
실행에서 services.msc을 입력해 서비스를 실행합니다.
Windows Time을 클릭 후 시작 유형을 자동으로 바꾼 후 시작을 눌러줍니다.
다음으로 내부 서버 설정입니다.
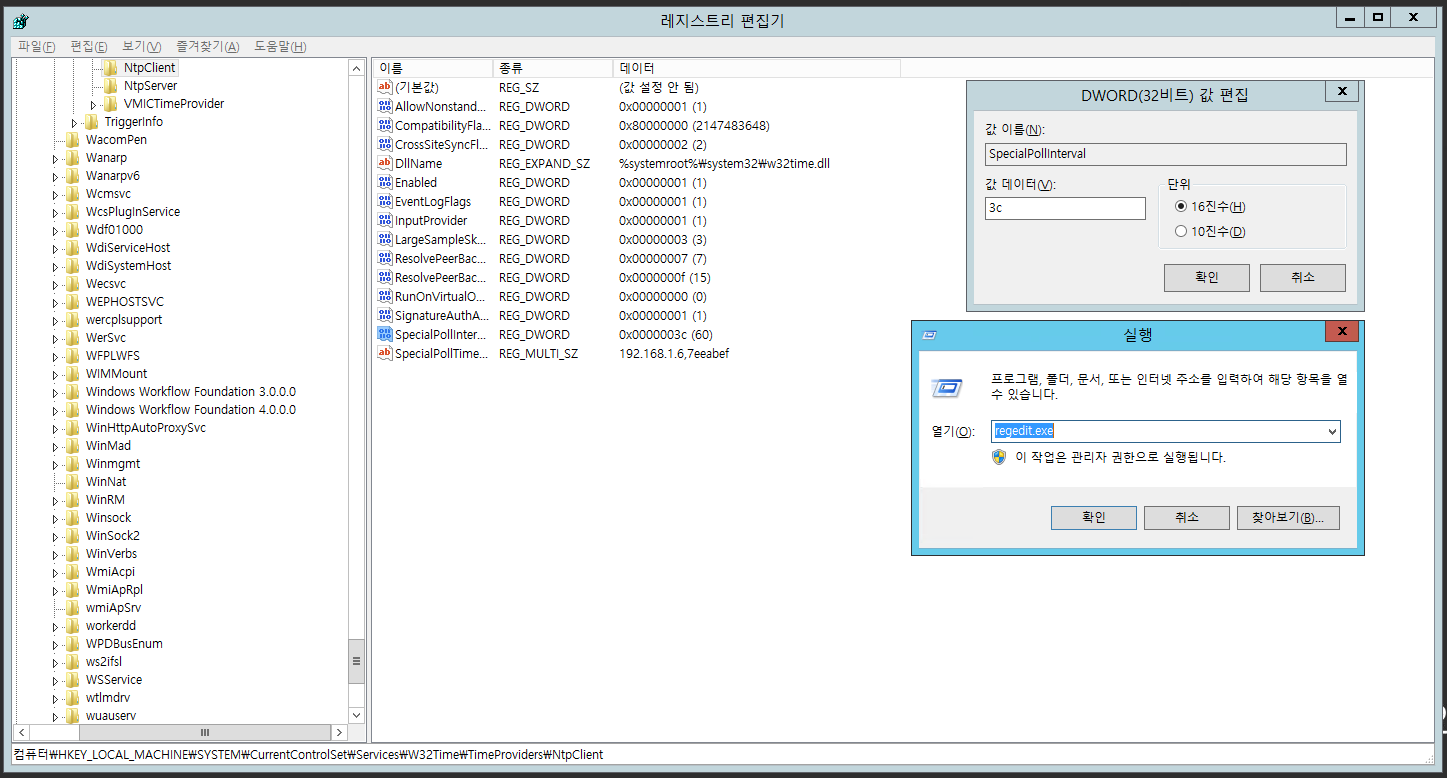
실행에서 regedit.exe를 입력해 레지스트리 편집기를 실행 후 HKEY_LOCAL_MACHINE\SYSTEM\CurrentControlSet\Services\W32Time\TimeProviders\NtpClient\SpecialPollInterval 값을 원하시는 동기화 주기로 입력합니다. (초 단위)
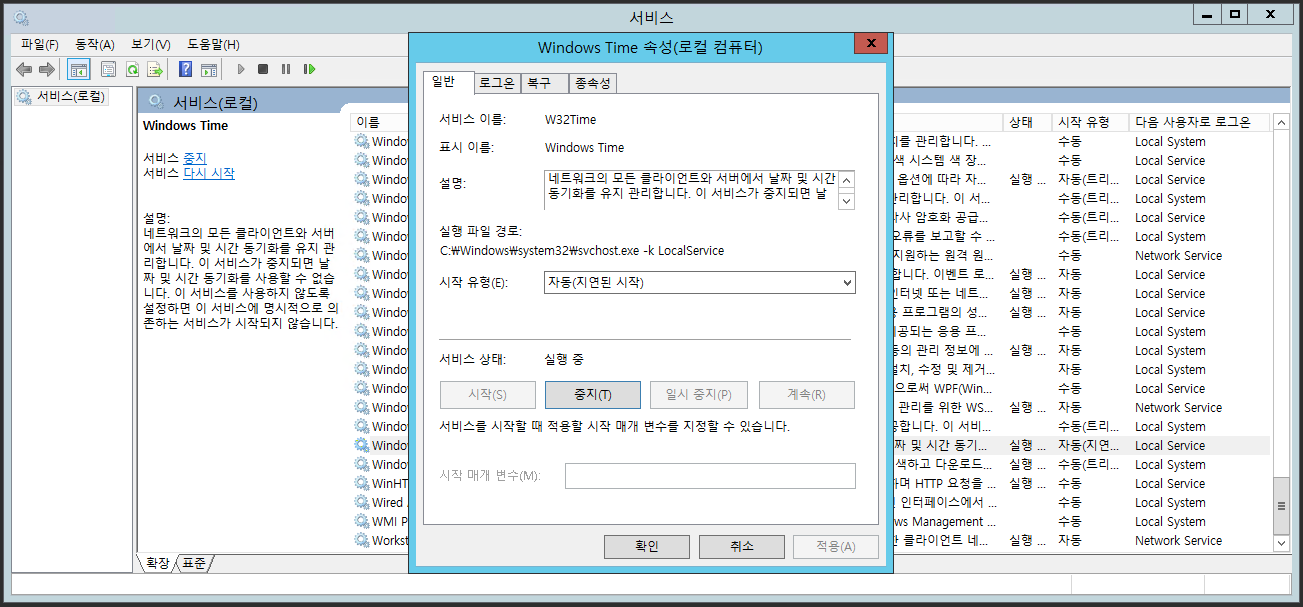
실행에서 services.msc를 입력해 서비스를 실행 후 Windows Time의 시작 유형을 자동(지연된 시작)으로 설정 후 시작합니다.
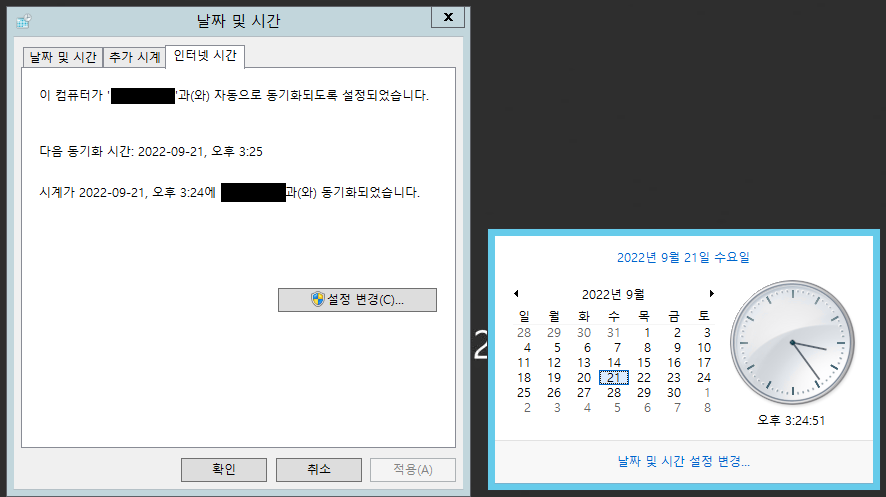
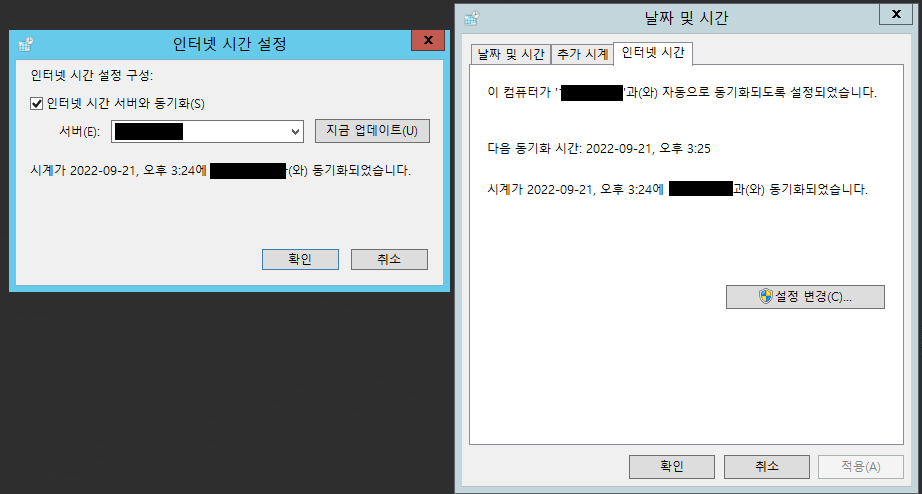
마지막으로 Windows 시간에서 [날짜 및 시간 설정 변경] > [날짜 및 시간] > [인터넷 시간] > [설정 변경]을 클릭합니다.
이제 설정한 서버의 IP를 입력 후 지금 업데이트를 통해 테스트 후 확인을 눌러 설정을 마무리 합니다.