728x90

기존에 설치된 Qt를 재설치 했더니 Qt5 버전에서 Quick Applicaiton Create가 안되는 증상이 있었습니다. 확인해보니 Qt Creator 10.0을 설치하면 Build System에 qmake가 없는 증상이 있고 그렇기 때문에 project를 생성할 수 없었습니다.

해당 문제를 해결하기 위해 Qt Creator 9.0으로 다운그레이드 하여 사용하겠습니다. 아래 링크를 통해 Qt Creator를 재설치 해줍니다.


Index of /official_releases/qtcreator/9.0/9.0.0


download.qt.io

qt-creator-opensource-windows-x86_64-9.0.0.exe을 설치합니다.


경로는 기본으로 설치합니다.

설치가 완료됐으면 방금 설치한 QtCreator 9.0을 설치합니다. 이제 다시 Project를 만들어 볼려고 해도 Kit에 아무것도 없거나 선택아 안될 것입니다.

그렇기 때문에 기존에 설치된 qmake를 등록하고 그에 맞는 Kit 설정도 해야 합니다. [Edit] > [Preference] > [Qt Version]에 Add를 눌러 기존 설치된 mingw8.1.0의 qmake를 설정합니다.

Apply 후 [Kits]로 넘어가서 Add 후 아래처럼 마무리 합니다.

그 후 Create Project를 하면 Supported Platforms에 Desktop이 추가가 됐고

Project가 정상적으로 만들어진 것을 확인할 수 있습니다.

위 포스팅은 아래 유튜브 영상을 참고하여 제작하였습니다.


728x90
728x90

Qt Creator를 통해 빌드한 결과물인 exe 파일을 단독으로 실행하면 아래처럼 오류 메시지가 나오게 됩니다.

실행파일을 실행하기 위해선 Qtcore에 명시한 dll들이 필요한데 그 dll들이 없어서 위와 같이 오류가 뜨게 됩니다. 이러한 dll들을 자동으로 추가해주는 windeployqt라는 툴도 있습니다.


[Qt] windeployqt 사용하기

Qt5부터 사용할 수 있는 windeployqt는 빌드 시 생성한 실행파일을 단독으로 실행할 수 있게 필요한 라이브러리를 자동으로 추가해주는 툴입니다. 그 후 프로젝트가 저장된 폴더로 이동하면 Release

1d1cblog.tistory.com

이번에는 dll 없이 단독으로 실행할 수 있게 Static build 환경을 만들어보겠습니다.


먼저 Qt Maintenance를 실행해 빌드 환경과 Source를 설치합니다.

설치가 완료되었으면 Qt가 설치된 폴더로 이동 후 Static 이라는 이름의 폴더를 하나 만들어줍니다.

그리고 그 Static 폴더 내부에 5.15.2(버전) 폴더를 하나 더 생성 후 Qt\5.15.2\Src 폴더를 Qt\Static에 복사합니다.

복사가 다 됐다면 Qt\Static\Src\qtbase\mkspecs\win32-g++ 폴더의 qmake.conf 에 아래 내용을 추가합니다.

QMAKE_LFLAGS += -static -static-libgcc
QMAKE_CFLAGS_RELEASE -= -O2
QMAKE_CFLAGS_RELEASE += -Os -momit-leaf-frame-pointer
DEFINES += QT_STATIC_BUILD

다음으로 CMD를 실행 후 환경 변수를 추가합니다. mingw은 설치된 버전에 맞춥니다.

다음으로 Qt Console을 실행하고 Qt\Static\Src로 이동 후 아래 코드를 실행합니다.

주의할 점은 -prefix 뒤 폴더는 생성한 폴더에 맞춰야 합니다.

configure -static -release -platform win32-g++ -prefix C:\Qt\Static\5.15.2 -qt-zlib -qt-pcre -qt-libpng -qt-libjpeg -qt-freetype -opengl desktop -no-openssl -opensource -confirm-license -make libs -nomake tools -nomake examples -nomake tests

configure이 끝났으면 마지막으로 아래 두 명령을 실행합니다. 아래 두 작업에는 대략 30분 ~ 1시간이 소요됩니다.

mingw32-make -k -j4
mingw32-make -k install

만약 Make 시에 아래처럼 Qml 쪽 에러가 나오고 JSC::Yarr::newlineCreate라는 에러 메시지가 나온다면 https://www.python.org/downloads/ 링크에서 Python을 다운로드 해줍니다.

설치 시에 Add Python.exe to PATH를 체크합니다.

make가 모두 끝났으면 Qt\Static\5.15.2\mkspecs\win32-g++에 있는 qmake.conf를 열어 아래 코드를 추가합니다.

CONFIG += static

이제 Qt Creator를 실행해 [Edit] > [Preference]를 실행합니다. [Qt Versions]에서 Add를 누른 후 Qt\Static\5.15.2\bin에 qmake.exe를 선택한 후 Apply 해줍니다.

다음으로 [Kits]로 이동해 Add 후 아래처럼 Qt Version에 위에서 만든 버전을 선택 후 적용합니다.

마지막으로 Projects에서 위에서 만든 Kit를 적용 후 Build합니다.


makersweb - Windows환경에서 mingw로 Qt 5.10 정적(static)빌드

환경: 윈도우7, Qt5.10 기본적으로 qt.io에서 배포된 Qt는 사전 빌드된 라이브러리들이 동적으로 링크된다. 즉, 응용프로그램이 실행 될때 사전 빌드된 DLL을 동적으로 참조한다. 문제는 이런 환경에

makersweb.net


728x90
728x90

QML 공부하면서 정리한 포스팅 링크 모음입니다.


[Qt] QML(0) - Qt Quick Application 시작하기

기존에 Qt Widget을 이용하여 UI를 구성하는 방법 말고도 Qml을 이용하여 UI를 구성하는 방법에 대해 공부해보려 합니다. Qt Creator를 실행 후 Create Project > Qt Quick Application을 선택합니다. 프로젝트를

1d1cblog.tistory.com


[Qt] QML(1) - Object, Layout, Event

지난 포스팅에서 Qt Quick Application 프로젝트를 생성하는 부분까지 포스팅했습니다. [Qt] Qt Quick Application 시작하기 기존에 Qt Widget을 이용하여 UI를 구성하는 방법 말고도 Qml을 이용하여 UI를 구성하

1d1cblog.tistory.com


[Qt] QML(2) - State/Transition, ListView, Variable

지난 포스팅에선 간단히 오브젝트와 컨테이너를 이용해서 배치하고 이벤트 처리를 하는 예제를 해봤습니다. [Qt] QML UI 구성하기(1) 지난 포스팅에서 Qt Quick Application 프로젝트를 생성하는 부분까

1d1cblog.tistory.com


[Qt] QML(3) - Control Object

이전 포스팅까지는 스위치 ON/OFF 예제라던지 등에 Rectangle에 MouseArea를 이용하여 버튼과 비슷한 동작을 만들어 사용했습니다. QtQuick.Controls 모듈을 import할 시 사용할 수 있는 Control Object는 기존의 B

1d1cblog.tistory.com


[Qt] QML(4) - QML/C++ 통합하기(Q_PROPERTY, Q_INVOKABLE, SIGNAL)

Qt Widget Application Project에서는 ui 파일에서 ui를 배치하고 c++ 코드에서 그 ui에 접근하여 수정하기도 했습니다. 그리고 c++ 코드에서 동적으로 UI를 배치할 수도 있었습니다. Qt Quick에서도 C++과 QML 사

1d1cblog.tistory.com


[Qt] QML(5) - TimeTimer 프로그램 만들기

QML으로 간단하게 TimeTimer라는 프로그램을 제작하면서 다른 기능도 사용해 보겠습니다. 이 예제를 진행하면서 만들어볼 간단한 프로그램은 TimeTimer입니다. TimeTimer는 위와 같이 생긴 시계인데 예

1d1cblog.tistory.com


[Qt] QML(6) - Loader, Binding, Connection

이전 예제로 TimeTimer를 만들어보면서 다른 Window를 Open 해보고 QML/C++ 간에 Signal과 Property를 통해 데이터를 연동하거나 신호를 주고받기도 하였습니다. [Qt] QML(5) - TimeTimer 프로그램 만들기 QML으로

1d1cblog.tistory.com


[Qt] QML(7) - ListView/Model C++ 로 처리하기

이전 포스팅에서 ListView를 QML로 보여주고 그 안에서 동적으로 관리하는 예제를 살펴봤습니다. [Qt] QML(2) - State/Transition, ListView, Property 지난 포스팅에선 간단히 오브젝트와 컨테이너를 이용해서

1d1cblog.tistory.com


[Qt] QML(8) - SoundEffect, ComboBox ListModel 적용

이전 포스팅에서 ListView에 아이템을 QAbstractModel을 상속받은 클래스를 통해 동적으로 관리하는 예제를 진행해봤습니다. [Qt] QML(7) - ListView/Model C++ 로 처리하기 이전 포스팅에서 ListView를 QML로 보여

1d1cblog.tistory.com


728x90
728x90

이전 포스팅에서 ListView에 아이템을 QAbstractModel을 상속받은 클래스를 통해 동적으로 관리하는 예제를 진행해봤습니다.


[Qt] QML(7) - ListView/Model C++ 로 처리하기

이전 포스팅에서 ListView를 QML로 보여주고 그 안에서 동적으로 관리하는 예제를 살펴봤습니다. [Qt] QML(2) - State/Transition, ListView, Property 지난 포스팅에선 간단히 오브젝트와 컨테이너를 이용해서

1d1cblog.tistory.com

이번 포스팅에서는 Combobox에 위와 같이 Model을 적용시켜 보고 이전에 만들었던 TimeTimer에 시간이 다 되었을 때 알림 소리를 낼 수 있게 SoundEffect, Sound를 적용시켜 보겠습니다.

위 예제는 이전 TimeTimer 예제를 보고 오시면 이해하는데 더 많은 도움을 받으실 수 있습니다.


[Qt] QML(5) - TimeTimer 프로그램 만들기

QML으로 간단하게 TimeTimer라는 프로그램을 제작하면서 다른 기능도 사용해 보겠습니다. 이 예제를 진행하면서 만들어볼 간단한 프로그램은 TimeTimer입니다. TimeTimer는 위와 같이 생긴 시계인데 예

1d1cblog.tistory.com


먼저 Combobox에 적용시킬 Model을 먼저 만들겠습니다. 이번에는 Model을 관리할 Manager 클래스 없이 바로 직접 지정해보려 합니다.

import SoundListItem 1.0

...

Label {
    text : "알람 소리"
    Layout.preferredWidth: parent.nWidth
    Layout.preferredHeight: parent.nHeight
    Layout.alignment: Qt.AlignVCenter | Qt.AlignRight
    verticalAlignment: Text.AlignVCenter
    horizontalAlignment: Text.AlignHCenter
}

ComboBox {
    id : alarmCombo
    Layout.preferredWidth: parent.nWidth + 70
    Layout.preferredHeight: parent.nHeight
    Layout.alignment: Qt.AlignCenter
    model : SoudListModelItem {}
    delegate: comboDelegate
}

QAbstractListModel을 상속받는 SoundListModelItem을 만들어줍니다. 이번에는 단일 아이템만 노출시키므로 roleName는 따로 override 하지 않았습니다. 하지만 rowCount와 datat는 무조건 override 해주어야 합니다.

#ifndef SoundListModelItem_H
#define SoundListModelItem_H

#include <QAbstractListModel>

class SoundListModelItem : public QAbstractListModel
{
    Q_OBJECT
public:
    explicit SoundListModelItem(QObject *parent = nullptr);

    virtual int rowCount(const QModelIndex &parent = QModelIndex()) const;
    virtual QVariant data(const QModelIndex &index, int role = Qt::DisplayRole) const;

    void loadAlarmList();

private:
    QStringList alarmSoundList;
};

#endif // SoundListModelItem_H

이 예제에서는 Alarm sound를 윈도우 자체가 가지고 있는 항목들을 사용하려 합니다.

#include "SoundListModelItem.h"
#include <QDebug>
#include <QDirIterator>

SoundListModelItem::SoundListModelItem(QObject *parent)
    : QAbstractListModel{parent}
{
    loadAlarmList();
}

int SoundListModelItem::rowCount(const QModelIndex &parent) const
{
    Q_UNUSED(parent)
    return alarmSoundList.count();
}

QVariant SoundListModelItem::data(const QModelIndex &index, int role) const
{
    int nRow = index.row();

    if ( nRow < 0 || nRow >= alarmSoundList.count() ) {
        return QVariant();
    }

    switch (role) {
    case Qt::DisplayRole:
        return alarmSoundList.value(nRow);
    }

    return QVariant();
}

void SoundListModelItem::loadAlarmList()
{
    QString sPath = "C:/Windows/Media";

    QDirIterator it(sPath, QDir::Files);

    while (it.hasNext()) {
        it.next();
        if ( it.fileName().indexOf("Alarm") != -1 ) {
            alarmSoundList.append(it.fileName());
        }
    }
}

Windows 폴더 아래 Media 폴더에는 각종 wav 파일이 있는데 여기서 Alarm 파일명을 가진 파일들만 가져오려고 합니다.

물론 qml에서 C++의 클래스를 사용하기 위해서 qmlRegisterType을 해주어야 합니다.

#include <QGuiApplication>
#include <QQmlApplicationEngine>
#include <QQmlContext>
#include "TimeTimerMgr.h"
#include "SoundListModelItem.h"

int main(int argc, char *argv[])
{
#if QT_VERSION < QT_VERSION_CHECK(6, 0, 0)
    QCoreApplication::setAttribute(Qt::AA_EnableHighDpiScaling);
#endif
    QGuiApplication app(argc, argv);
    qmlRegisterType<SoundListModelItem>("SoundListItem", 1,0, "SoundListModelItem");

    QQmlApplicationEngine engine;

    const QUrl url(QStringLiteral("qrc:/TimeTimer.qml"));
    QObject::connect(&engine, &QQmlApplicationEngine::objectCreated, &app,
        [url](QObject *obj, const QUrl &objUrl) {
            if (!obj && url == objUrl)
                QCoreApplication::exit(-1);
        }
    , Qt::QueuedConnection);

    engine.load(url);

    TimeTimerMgr timerMgr;
    timerMgr.SetEngine(&engine);
    return app.exec();
}

다음으로 qml Combox Model에 Delegate를 설정하겠습니다. 리스트에 파일명이랑 재생 버튼을 두고 버튼을 클릭하면 미리듣기 해보는 방식으로 해보려 합니다.

Component {
    id : comboDelegate
    Row {
        Rectangle {
            width: alarmCombo.width - 30
            height : 30
            Text {
                anchors.fill : parent
                text : model.display
                horizontalAlignment: Text.AlignHCenter
                verticalAlignment: Text.AlignVCenter
            }
        }
        Button {
            width: 30
            height : 30
            Text {
                anchors.fill : parent
                text : "재생"
                horizontalAlignment: Text.AlignHCenter
                verticalAlignment: Text.AlignVCenter
            }

            onClicked : {
                // sound play
            }
        }
    }
}

여기서 SoundEffect를 사용해보겠습니다. SoundEfffect Component 생성 후 id 만 지정합니다. 이후 Button의 onClicked에서 source 지정 후 play 시켜주면 됩니다.

Component {
    id : comboDelegate
    Row {
        Rectangle {
            width: alarmCombo.width - 30
            height : 30
            Text {
                anchors.fill : parent
                text : model.display
                horizontalAlignment: Text.AlignHCenter
                verticalAlignment: Text.AlignVCenter

                MouseArea {
                    anchors.fill: parent
                    onClicked: {
                        alarmSound.stop()
                        alarmCombo.displayText = model.display
                        alarmCombo.popup.close()
                    }
                }
            }
        }
        Button {
            width: 30
            height : 30
            Text {
                anchors.fill : parent
                text : "재생"
                horizontalAlignment: Text.AlignHCenter
                verticalAlignment: Text.AlignVCenter
            }

            onClicked : {
                alarmSound.source = "file:C:/Windows/Media/" + model.display
                console.log(alarmSound.source)
                alarmSound.play()
            }
        }
    }
}

SoundEffect {
    id : alarmSound
}

해당 효과까지 적용한 결과는 아래와 같습니다. 재생 버튼을 클릭하면 해당 wav 파일을 들어볼 수 있고 원하는 알람 소리를 클릭하면 combobox의 popup을 닫고 combox에 해당 파일명을 display 해줍니다.

이제 이 선택한 알림 소리를 타이머가 다 되었을 때 재생시켜 보겠습니다. SettingDialog.qml로 부터 signal을 받아 알람 파일명을 TimeTimerMgr까지 가져옵니다. 그리고 Timeout이 되었을 때 QSound::play 함수를 실행시킵니다.

#include "TimeTimerMgr.h"
#include <QQmlProperty>
#include <QSound>

TimeTimerMgr::TimeTimerMgr(QObject *parent)
    : QObject{parent}
    , m_pDialog(NULL)
    , m_engine(NULL)
    , m_pWindow(NULL)
    , m_pTimeCanvas(NULL)
    , m_nTime(0)
    , m_nCount(0)
    , m_sAlarmSound("")
{
    connect(&timer, SIGNAL(timeout()), this, SLOT(Slot_Timeout()), Qt::UniqueConnection);
}

void TimeTimerMgr::showDialog()
{
    if ( m_pDialog != NULL ) { return; }
    m_pDialog = new ConfigureDialog(this, m_engine);

    connect(m_pDialog, SIGNAL(Emit_setColor(QColor)), this, SLOT(Slot_GetColor(QColor)), Qt::UniqueConnection);
    connect(m_pDialog, SIGNAL(Emit_setOpacity(double)), this, SLOT(Slot_GetOpacity(double)), Qt::UniqueConnection);
    connect(m_pDialog, SIGNAL(Emit_setAlwaysOnTop(bool)), this, SLOT(Slot_GetAlwaysOnTop(bool)), Qt::UniqueConnection);
    connect(m_pDialog, SIGNAL(Emit_setAlarmSound(QString)), this, SLOT(Slot_GetAlarmSound(QString)), Qt::UniqueConnection);
    connect(m_pDialog, SIGNAL(Emit_Close()), this, SLOT(Slot_DialogClose()), Qt::UniqueConnection);

    TimerSetting settingValue;
    settingValue.color        = m_pTimeCanvas->property("timeColor").value<QColor>();
    settingValue.opacity      = m_pWindow->property("dOpacity").toDouble();
    settingValue.bAlwaysOnTop = m_pWindow->property("bAlwaysOnTop").toBool();
    settingValue.sAlarmSound  = m_sAlarmSound;

    m_pDialog->Show();
    m_pDialog->SetSettingValue(settingValue);
}

... 

void TimeTimerMgr::Slot_Timeout()
{
    m_nCount++;
    m_pTimeCanvas->setProperty("setSecond", (m_nTime*60-m_nCount));
    QMetaObject::invokeMethod(m_pTimeCanvas, "rePaint");

    if ( m_nTime*60 == m_nCount ) {
        timer.stop();
        m_pWindow->setFlag(Qt::WindowStaysOnTopHint, false);
        m_pWindow->setProperty("bAlwaysOnTop", false);

        QSound::play("C:/Windows/Media/" + m_sAlarmSound);
    }
}

...

풀 코드는 아래 Github 링크에서 확인하실 수 있습니다.


GitHub - psy1064/TimeTimer_Qt: TimeTimer Use Qt/QML

TimeTimer Use Qt/QML. Contribute to psy1064/TimeTimer_Qt development by creating an account on GitHub.

github.com


728x90
728x90

이전 포스팅에서 ListView를 QML로 보여주고 그 안에서 동적으로 관리하는 예제를 살펴봤습니다.


[Qt] QML(2) - State/Transition, ListView, Property

지난 포스팅에선 간단히 오브젝트와 컨테이너를 이용해서 배치하고 이벤트 처리를 하는 예제를 해봤습니다. [Qt] QML UI 구성하기(1) 지난 포스팅에서 Qt Quick Application 프로젝트를 생성하는 부분까

1d1cblog.tistory.com

이번에는 C++에서 AbstractItemModel을 상속받아 Model을 만들고 그 Model을 가지고 데이터를 처리해보겠습니다.


예전에 설명했듯이 List로 데이터를 Display하기 위해서 Model(데이터), View(리스트 그려줌), Delegate(Style)이 필요했습니다.

ListModel {
    id:nameModel
    ListElement {
        name: "park"
        age : 20
    }
    ListElement {
        name: "kim"
        age : 25
    }
    ListElement {
        name: "lee"
        age : 30
    }
} // 데이터를 담는 Model

Component {
     id: nameDelegate
     Item {
         width : windows.width
         height : dataHeight

         Text {
             anchors.fill: parent
             text: "name : " + name + "\n" + "age : " + age;
             verticalAlignment: Text.AlignVCenter
             anchors.leftMargin: 10
         }
         MouseArea {
             anchors.fill: parent
             onClicked: nameList.currentIndex = index
         }
     }
 } // 데이터를 표현하는 Style

ListView {
    id : nameList
    width : parent.width
    height : listViewheight
    model : nameModel
    delegate: nameDelegate
    highlight: listHighLight
} // 데이터를 보여주는 View

위 예제에는 Model을 qml 내에서 자체적으로 생성하였고 qml의 이벤트를 통해서 append하거나 remove 하였습니다.

Rectangle {
    width : parent.width/nCount
    height : parent.height
    color: "gray"
    border.width: 1

    Text {
        anchors.fill: parent
        horizontalAlignment: Text.AlignHCenter
        verticalAlignment: Text.AlignVCenter
        text : "input"
    }
    MouseArea {
        anchors.fill: parent
        onClicked: {
            nameModel.append({ name: nameInput.text,
                               age : parseInt(ageInput.text)
                            })
            nameInput.text = ""
            ageInput.text = ""
            nameInput.focus = false
            ageInput.focus = false
        }
    }
}

Rectangle {
    width : parent.width/nCount
    height : parent.height
    color: "red"
    border.width: 1

    Text {
        anchors.fill: parent
        horizontalAlignment: Text.AlignHCenter
        verticalAlignment: Text.AlignVCenter
        text : "delete"
    }
    MouseArea {
        anchors.fill: parent
        onClicked: {
            if ( nameModel.count > 0 ) {
                nameModel.remove(nameList.currentIndex);
                nameList.currentIndex = -1
            }
        }
    }
}

이번에는 model 자체를 C++ 객체를 통해 가져와보겠습니다. C++ 쪽 클래스는 QAbstractListModel을 상속받는 Model 클래스와 그 클래스를 가지고 있는 Manager 클래스를 만들겠습니다. qml의 ListView는 이 Manager 함수를 통해 Model을 관리하게 됩니다.


위 설명대로 nameList에서는 model로 ModelMgr을 통해 MDataModel을 받고 있습니다. 그리고 input, delete도 ModelMgr을 통해 Model에 접근하고 있습니다.

import QtQuick 2.15
import QtQuick.Window 2.15


Window {
    ...
    
    Column {
        spacing : columnSpacing
        width : parent.width
        height : parent.height
        ListView {
            id : nameList
            width : parent.width
            height : listViewheight
            model : ModelMgr.getModel()
            delegate: nameDelegate
            highlight: listHighLight
        } // 데이터를 보여주는 View

        ...
            Rectangle {
                width : parent.width/nCount
                height : parent.height
                color: "gray"
                border.width: 1

                Text {
                    anchors.fill: parent
                    horizontalAlignment: Text.AlignHCenter
                    verticalAlignment: Text.AlignVCenter
                    text : "input"
                }
                MouseArea {
                    anchors.fill: parent
                    onClicked: {
                        ModelMgr.addItem(nameInput.text, parseInt(ageInput.text));
                        nameInput.text = ""
                        ageInput.text = ""
                        nameInput.focus = false
                        ageInput.focus = false
                    }
                }
            }

            Rectangle {
                width : parent.width/nCount
                height : parent.height
                color: "red"
                border.width: 1

                Text {
                    anchors.fill: parent
                    horizontalAlignment: Text.AlignHCenter
                    verticalAlignment: Text.AlignVCenter
                    text : "delete"
                }
                MouseArea {
                    anchors.fill: parent
                    onClicked: {
                        ModelMgr.removeItem(nameList.currentIndex)
                    }
                }
            }
        }
    }
}

하지만 이대로 실행한다면 아래처럼 에러 메시지가 나오게 됩니다.

main.qml 측에서는 MDataModel 클래스에 대한 정보가 없기 때문입니다. 이를 위해서 qmlregistertype를 통해서 등록시켜줘야 합니다. 추가로 qml에서 ModelMgr의 함수를 호출할 것이기 때문에 setContextProperty를 통해 넘겨줍니다.

#include <QGuiApplication>
#include <QQmlApplicationEngine>
#include <QQmlContext>
#include "ModelMgr.h"

int main(int argc, char *argv[])
{
#if QT_VERSION < QT_VERSION_CHECK(6, 0, 0)
    QCoreApplication::setAttribute(Qt::AA_EnableHighDpiScaling);
#endif
    QGuiApplication app(argc, argv);

    qmlRegisterType<MDataModel>("DataModel", 1, 0, "MDataModel");

    QQmlApplicationEngine engine;
    const QUrl url(QStringLiteral("qrc:/main.qml"));
    QObject::connect(&engine, &QQmlApplicationEngine::objectCreated,
                     &app, [url](QObject *obj, const QUrl &objUrl) {
        if (!obj && url == objUrl)
            QCoreApplication::exit(-1);
    }, Qt::QueuedConnection);


    ModelMgr dataMgr;
    engine.rootContext()->setContextProperty("DataMgr", &dataMgr);

    engine.load(url);


    return app.exec();
}

qmlRegisterType를 통해 객체를 등록했으면 qml 에서는 import 시켜줄 수 있습니다.

import QtQuick 2.15
import QtQuick.Window 2.15
import DataModel 1.0

Window {
    property int listViewheight : ModelMgr.count * dataHeight;
    property int dataHeight : 50;
    property int inputUIHeight : 30;
    property int columnSpacing : 10;
    ...
    
}


다음은 ModelMgr 클래스입니다. 이 클래스는 QAbstractListModel을 상속받은 클래스를 변수로 가지고 있고 qml에서 add, remove 시에 Model에 전달해주기 위한 클래스입니다. count를 통해 listView의 크기를 동적으로 조절하기 위해 Q_PROPERTY로 설정하고 add, remove 시 countChanged signal을 발생시키고 있습니다.

#ifndef MODELMGR_H
#define MODELMGR_H

#include <QObject>
#include "mdatamodel.h"

class ModelMgr : public QObject
{
    Q_OBJECT

    Q_PROPERTY(int count READ count NOTIFY countChanged)

public:
    explicit ModelMgr(QObject *parent = nullptr);

    Q_INVOKABLE MDataModel* getModel() { return &m_Data; }
    Q_INVOKABLE void addItem(QString sName, int age);
    Q_INVOKABLE void removeItem(int nRow);
    int count() { return m_Data.rowCount(); }

signals:
    void countChanged();
private:
    MDataModel m_Data;
};

#endif // MODELMGR_H
#include "ModelMgr.h"
#include <QDebug>

ModelMgr::ModelMgr(QObject *parent)
    : QObject{parent}
{
}

void ModelMgr::addItem(QString sName, int age)
{
    m_Data.addItem(sName, age);
    emit countChanged();
}

void ModelMgr::removeItem(int nRow)
{
    m_Data.removeItem(nRow);
    emit countChanged();
}

다음으로 QAbstractListModel을 상속받고 있는 MDataModel 클래스입니다. 이 QAbstractModelItem을 상속받아 사용하기 위해서는 virtual로 되어 있는 세 함수는 모두 override 해주어야 합니다.

#ifndef MDATAMODEL_H
#define MDATAMODEL_H

#include <QAbstractListModel>

typedef struct _info {
    QString sName;
    int nAge;

    _info() {
        sName = "";
        nAge  = 0;
    }
} info;

enum enRole {
    nName = Qt::UserRole,
    nAge
};

class MDataModel : public QAbstractListModel
{
    Q_OBJECT
public:
    explicit MDataModel(QObject* parent = nullptr);

    virtual int rowCount(const QModelIndex & = QModelIndex()) const;
    virtual QVariant data(const QModelIndex &index, int nRole) const;
    void addItem(QString sName, int age);
    void removeItem(int nRow);

protected:
    virtual QHash<int, QByteArray> roleNames() const;

private:
    QList<info> m_infoList;
};

#endif // MDATAMODEL_H
#include "mdatamodel.h"
#include <QDebug>

MDataModel::MDataModel(QObject *parent) :
    QAbstractListModel(parent)
{
}

int MDataModel::rowCount(const QModelIndex &) const
{
    return m_infoList.count();
}

QVariant MDataModel::data(const QModelIndex &index, int nRole) const
{
    int nRow = index.row();
    if (nRow < 0)
        return QVariant();

    info item = m_infoList.value(nRow);
    QString sData = "";

    switch (nRole)
    {
    case nName:
        sData = item.sName;
        break;
    case nAge:
        sData = QString::number(item.nAge);
        break;
    }

    return sData;
}

QHash<int, QByteArray> MDataModel::roleNames() const
{
    QHash<int, QByteArray> role;
    role[nName] = "Data";
    role[nAge] = "Age";

    return role;
}

void MDataModel::addItem(QString sName, int age)
{
    int nRow = rowCount();
    beginInsertRows(QModelIndex(), nRow, nRow);

    info newInfo;
    newInfo.sName = sName;
    newInfo.nAge = age;
    m_infoList.append(newInfo);

    endInsertRows();
}

void MDataModel::removeItem(int nRow)
{
    beginRemoveRows(QModelIndex(), nRow, nRow);

    m_infoList.removeAt(nRow);

    endRemoveRows();
}

이전 포스팅과 add, remove시에 결과는 같지만 qml 상에서 로직을 처리한 것을 c++로 QAbstractModelItem을 이용해서 처리하였습니다. 아래는 main.qml의 전체 코드입니다.

import QtQuick 2.15
import QtQuick.Window 2.15
import DataModel 1.0

Window {
    property int listViewheight : ModelMgr.count * dataHeight;
    property int dataHeight : 50;
    property int inputUIHeight : 30;
    property int columnSpacing : 10;
    property int nCount : 6;

    width: 300
    height: listViewheight + inputUIHeight + columnSpacing;
    visible: true
    id:windows

    Component {
        id: nameDelegate
        Item {
            width : windows.width
            height : dataHeight

            Text {
                anchors.fill: parent
                text: "name : " + model.Data + "\nage : " + model.Age;
                verticalAlignment: Text.AlignVCenter
                anchors.leftMargin: 10
            }
            MouseArea {
                anchors.fill: parent
                onClicked: nameList.currentIndex = index
            }
        }
    } // 데이터를 표현하는 Style

    Component {
        id:listHighLight
        Rectangle{
            color : "blue"
        }
    } // Highlight

    Column {
        spacing : columnSpacing
        width : parent.width
        height : parent.height
        ListView {
            id : nameList
            width : parent.width
            height : listViewheight
            model : ModelMgr.getModel()
            delegate: nameDelegate
            highlight: listHighLight
        } // 데이터를 보여주는 View

        Row {
            width : parent.width
            height: inputUIHeight

            Rectangle {
                border.width: 1
                width : parent.width/nCount
                height : parent.height
                Text {
                    anchors.fill: parent
                    horizontalAlignment: Text.AlignHCenter
                    verticalAlignment: Text.AlignVCenter
                    text : "name"
                }
            }

            Rectangle {
                width : parent.width/nCount
                height : parent.height
                border.color: "black"
                border.width: 1
                TextInput {
                    id:nameInput
                    anchors.fill: parent
                    horizontalAlignment: Text.AlignHCenter
                    verticalAlignment: Text.AlignVCenter
                    onFocusChanged: {
                        focus? parent.color = "deepskyblue" : parent.color = "white"
                    }
                }
            }

            Rectangle {
                border.width: 1
                width : parent.width/nCount
                height : parent.height
                Text {
                    anchors.fill: parent
                    horizontalAlignment: Text.AlignHCenter
                    verticalAlignment: Text.AlignVCenter
                    text : "age"
                }
            }
            Rectangle {
                width : parent.width/nCount
                height : parent.height
                border.color: "black"
                border.width: 1
                TextInput {
                    id:ageInput
                    anchors.fill: parent
                    horizontalAlignment: Text.AlignHCenter
                    verticalAlignment: Text.AlignVCenter
                    onFocusChanged: {
                        focus? parent.color = "deepskyblue" : parent.color = "white"
                    }
                }
            }
            Rectangle {
                width : parent.width/nCount
                height : parent.height
                color: "gray"
                border.width: 1

                Text {
                    anchors.fill: parent
                    horizontalAlignment: Text.AlignHCenter
                    verticalAlignment: Text.AlignVCenter
                    text : "input"
                }
                MouseArea {
                    anchors.fill: parent
                    onClicked: {
                        ModelMgr.addItem(nameInput.text, parseInt(ageInput.text));
                        nameInput.text = ""
                        ageInput.text = ""
                        nameInput.focus = false
                        ageInput.focus = false
                    }
                }
            }

            Rectangle {
                width : parent.width/nCount
                height : parent.height
                color: "red"
                border.width: 1

                Text {
                    anchors.fill: parent
                    horizontalAlignment: Text.AlignHCenter
                    verticalAlignment: Text.AlignVCenter
                    text : "delete"
                }
                MouseArea {
                    anchors.fill: parent
                    onClicked: {
                        ModelMgr.removeItem(nameList.currentIndex)
                    }
                }
            }
        }
    }
}
728x90
728x90

이전 예제로 TimeTimer를 만들어보면서 다른 Window를 Open 해보고 QML/C++ 간에 Signal과 Property를 통해 데이터를 연동하거나 신호를 주고받기도 하였습니다.


[Qt] QML(5) - TimeTimer 프로그램 만들기

QML으로 간단하게 TimeTimer라는 프로그램을 제작하면서 다른 기능도 사용해 보겠습니다. 이 예제를 진행하면서 만들어볼 간단한 프로그램은 TimeTimer입니다. TimeTimer는 위와 같이 생긴 시계인데 예

1d1cblog.tistory.com

이번에는 동적으로 다른 qml을 Load해서 사용할 수 있는 Loader에 대해 알아보려 합니다.


UI는 간단하게 아래처럼 구성되어 있습니다. 왼쪽에는 버튼들이 있고 버튼들을 클릭할 때마다 그에 맞는 qml 파일을 Loader가 Load 할 수 있게 되어 있습니다.

main.qml입니다. Loader에 source에 qml 파일을 지정해주고 있습니다.

import QtQuick 2.15
import QtQuick.Window 2.15
import QtQuick.Layouts 1.3
import QtQuick.Controls 2.15

Window {
    id:windows
    width: 480
    height: 300
    visible: true
    title: qsTr("Hello World")

    RowLayout {
        spacing:0
        Rectangle {
            border.width: 1
            Layout.preferredWidth : windows.width/4
            Layout.preferredHeight : windows.height

            ColumnLayout {
                anchors.centerIn: parent
                spacing : 20
                Button {
                    Layout.preferredHeight: windows.height/4
                    text:"Load\nQml1"
                    onClicked: {
                        mainLoader.source = "Item1.qml"
                    }
                }
                Button {
                    Layout.preferredHeight: windows.height/4
                    text:"Load\nQml2"
                    onClicked: {
                        mainLoader.source = "Item2.qml"
                    }
                }
                Button {
                    Layout.preferredHeight: windows.height/4
                    text:"Load\nQml3"
                    onClicked: {
                        mainLoader.source = "Item3.qml"
                    }
                }
            }
        }

        Rectangle {
            Layout.preferredWidth : windows.width*3/4
            Layout.preferredHeight : windows.height

            Loader {
                anchors.fill: parent
                id:mainLoader
                source : "Item1.qml"
            }
        }
    }
}

Item.qml입니다.

import QtQuick 2.15

Item {
    id:item1
    anchors.fill : parent
    Text {
        anchors.centerIn: parent
        text:"Item 1"
    }
}

여기서 Binding을 사용해 보겠습니다. Binding을 하면 다른 Item의 Property 값을 경신해 줄 수 있다고 보면 됩니다. 

import QtQuick 2.15
import QtQuick.Window 2.15
import QtQuick.Layouts 1.3
import QtQuick.Controls 2.15

Window {
    id:windows
    width: 480
    height: 300
    visible: true
    title: qsTr("Hello World")

    RowLayout {
        spacing:0
        Rectangle {
            border.width: 1
            Layout.preferredWidth : windows.width/4
            Layout.preferredHeight : windows.height

            ColumnLayout {
                anchors.centerIn: parent
                spacing : 20
                Button {
                    Layout.preferredHeight: windows.height/4
                    text:"Load\nQml1"
                    onClicked: {
                        mainLoader.source = "Item1.qml"
                    }
                }
                Button {
                    Layout.preferredHeight: windows.height/4
                    text:"Load\nQml2"
                    onClicked: {
                        mainLoader.source = "Item2.qml"
                    }
                }
                Button {
                    Layout.preferredHeight: windows.height/4
                    text:"Load\nQml3"
                    id:button3
                    onClicked: {
                        mainLoader.source = "Item3.qml"
                    }
                }
            }
        }

        Rectangle {
            Layout.preferredWidth : windows.width*3/4
            Layout.preferredHeight : windows.height - 30

            ColumnLayout {
                anchors.fill : parent
                Loader {
                    Layout.preferredWidth: parent.width
                    Layout.preferredHeight : parent.height - 30
                    id:mainLoader
                    source: "Item1.qml"
                }

                TextField {
                    id:colorInput
                    text:"white"
                    Layout.preferredWidth: parent.width
                    Layout.preferredHeight : 30
                }
            }
        }
    }

    Binding {
        target:mainLoader.item
        property: "backColor"
        value : colorInput.text
    }
}

여기서 Binding은 target(갱신할 대상)에 mainLoader의 item의 backColor Property를 지정하고 있습니다. 여기서 이 property에 넣어줄 값은 TextField가 가지고 있는 text 값입니다. 이렇게 설정해 주면 TextField의 값을 변경할 때마다 매번 set 해주지 않아도 됩니다.

만약 binding을 사용하지 않고 TextField의 Signal을 이용한다면 Loader의 source가 바뀔 때는 제대로 적용이 되지 않습니다.

TextField {
    id:colorInput
    text:"white"
    Layout.preferredWidth: parent.width
    Layout.preferredHeight : 30
    onTextChanged: {
        mainLoader.item.backColor = text
    }
}

다음으로 connections입니다. qml item 간에 signal을 받아 처리하게 됩니다. main.qml에 아래 Connection을 추가하면 item에서 Signal을 발생시키면 function을 호출하게 됩니다.


Signal을 발생시킬 Item에 signal을 선언하고 원하는 때에 signal을 발생시킵니다.

import QtQuick 2.15
Item {
    property color backColor : "white"
    signal emit_ChangeColor(color backColor)

    id:item1
    anchors.fill : parent
    Rectangle {
        anchors.fill: parent
        color: backColor

        Text {
            anchors.centerIn: parent
            text:"Item 1"
        }

        onColorChanged: {
            item1.emit_ChangeColor(backColor)
        }
    }
}

signal을 받을 쪽에서는 connection을 아래와 같이 넣습니다. signal을 받을 대상(target)과 그 대상에서 보내주는 시그널을 받았을 때 실행할 함수(on<Signal>)을 넣어줍니다.

Connections {
    target: mainLoader.item
    function onEmit_ChangeColor(backColor) {
        console.log(backColor)
    }
}

main.qml의 전체 코드입니다.

import QtQuick 2.15
import QtQuick.Window 2.15
import QtQuick.Layouts 1.3
import QtQuick.Controls 2.15

Window {
    id:windows
    width: 480
    height: 300
    visible: true
    title: qsTr("Hello World")

    RowLayout {
        spacing:0
        Rectangle {
            border.width: 1
            Layout.preferredWidth : windows.width/4
            Layout.preferredHeight : windows.height

            ColumnLayout {
                anchors.centerIn: parent
                spacing : 20
                Button {
                    Layout.preferredHeight: windows.height/4
                    text:"Load\nQml1"
                    onClicked: {
                        mainLoader.source = "Item1.qml"
                    }
                }
                Button {
                    Layout.preferredHeight: windows.height/4
                    text:"Load\nQml2"
                    onClicked: {
                        mainLoader.source = "Item2.qml"
                    }
                }
                Button {
                    Layout.preferredHeight: windows.height/4
                    text:"Load\nQml3"
                    id:button3
                    onClicked: {
                        mainLoader.source = "Item3.qml"
                    }
                }
            }
        }

        Rectangle {
            Layout.preferredWidth : windows.width*3/4
            Layout.preferredHeight : windows.height - 30

            ColumnLayout {
                anchors.fill : parent
                Loader {
                    Layout.preferredWidth: parent.width
                    Layout.preferredHeight : parent.height - 30
                    id:mainLoader
                    source: "Item1.qml"
                }

                TextField {
                    id:colorInput
                    text:"white"
                    Layout.preferredWidth: parent.width
                    Layout.preferredHeight : 30
                }
            }
        }
    }

    Connections {
        target: mainLoader.item
        function onEmit_ChangeColor(backColor) {
            console.log(backColor)
        }
    }

    Binding {
        target:mainLoader.item
        property: "backColor"
        value : colorInput.text
    }
}


728x90
728x90

QML으로 간단하게 TimeTimer라는 프로그램을 제작하면서 다른 기능도 사용해 보겠습니다. 

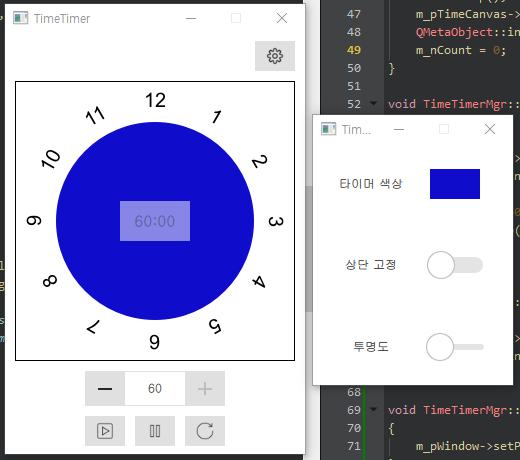
TimeTimer는 위와 같이 생긴 시계인데 예전에 크롬 확장 프로그램 만들기에서도 진행했었는데 예제로 사용하기 괜찮아서 이번에는 Qt/QML로 한번 만들어보면서 익숙해져보려 합니다.


크롬 확장프로그램 Time Timer 개발하기 - 4

이제 만들어진 시계 타이머 둘레에 숫자를 입력해보겠습니다. 현재 만든 시계의 좌표는 아래와 같습니다. 이 원의 둘레 주변에 1 ~ 12의 숫자를 넣어주려고 합니다. 우선 간단하게 12시에만 숫자

1d1cblog.tistory.com

먼저 완성된 UI부터 보여드리겠습니다. Main 화면 UI입니다. 가장 위부터 설정할 수 있는 window를 띄워줄 Button, 시계 UI, 시간 설정할 수 있는 Spinbox, Start / Pause / Stop Button입니다. 시간 UI에는 남은 시간도 보여줄 수 있는 Label도 있습니다.

UI에 사용된 TimeTimer.qml 파일입니다. 

import QtQuick 2.15
import QtQuick.Window 2.15
import QtQuick.Controls 2.15
import QtQuick.Layouts 1.15

Window {
    id:windows
    property int windowWidth : 300;
    property int windowHeight : 420;

    property double dOpacity: 1
    property bool bAlwaysOnTop : false
    opacity: dOpacity

    width: windowWidth
    height: windowHeight

    minimumWidth: windowWidth
    maximumWidth: windowWidth

    minimumHeight: windowHeight
    maximumHeight: windowHeight

    visible: true
    signal emit_Start();
    signal emit_Pause();
    signal emit_Stop();

    Item {
        anchors.fill: parent
        ColumnLayout {
            spacing : 10
            anchors.centerIn : parent
            Button {
                Layout.preferredWidth: 40
                Layout.preferredHeight:30
                Layout.alignment: Qt.AlignRight
                icon.name: "setting"
                icon.source: "qrc:/icon/setting.png"
                onClicked: {
                    timerMgr.showDialog()
                }
            }

            Rectangle {
                border.width: 1
                Layout.preferredWidth: 280
                Layout.preferredHeight:280

                Canvas {
                    id:backgroundCanvas
                    anchors.fill: parent
                    property int centerX: parent.width / 2
                    property int centerY: parent.height / 2
                    property int radius : parent.width / 2 - 39
                    property color backColor : "white"

                    onPaint: {
                        var ctx = backgroundCanvas.getContext("2d");
                        ctx.beginPath()
                        ctx.fillStyle = backColor
                        ctx.arc(centerX, centerY, radius, 0, 2*Math.PI)
                        ctx.fill()
                        ctx.closePath()
                    }
                }

                Canvas {
                    id:timerCanvas
                    objectName:"timeCanvas"
                    anchors.fill: parent
                    property int centerX: parent.width / 2
                    property int centerY: parent.height / 2
                    property int radius : parent.width / 2 - 41

                    property int setMinute: 60
                    property int setSecond: setMinute*60

                    property color timeColor : "red"

                    onPaint: {
                        var time = setSecond;
                        var end = (45-(time/60))*6;
                        var ctx = timerCanvas.getContext("2d");
                        ctx.reset()
                        ctx.beginPath()
                        ctx.fillStyle = timeColor
                        ctx.moveTo(centerX,centerY);
                        ctx.arc(centerX, centerY, radius, (Math.PI/180)*end, (Math.PI/180)*270);
                        ctx.fill()
                        ctx.closePath()
                    }

                    function rePaint() {
                        timerCanvas.requestPaint()
                    }
                }

                Canvas {
                    id:clockNumber
                    anchors.fill: parent

                    property int centerX: parent.width / 2
                    property int centerY: parent.height / 2

                    onPaint: {
                        var ctx = clockNumber.getContext("2d");
                        ctx.font = "20px sans-serif";
                        ctx.textAlign = "center";
                        ctx.textBaseline = "middle";
                        ctx.fillStyle = "black";
                        ctx.beginPath()
                        ctx.translate(centerX,centerY);
                        for ( var number = 1; number <= 12; number++ ){
                            var angle = (Math.PI / 180) * 30;
                            ctx.rotate( angle );
                            ctx.fillText( number, 0, -120);
                        }
                        ctx.closePath()
                    }
                }

                Rectangle {
                    anchors.centerIn: parent
                    opacity: 0.5
                    width : 70
                    height : 40
                    Label {
                        id:remainTime
                        anchors.fill: parent
                        horizontalAlignment: Text.AlignHCenter
                        verticalAlignment: Text.AlignVCenter
                        font.pixelSize: 15
                        text : (parseInt(timerCanvas.setSecond / 60)).toString().padStart(2,'0')
                               + ":" + (parseInt(timerCanvas.setSecond % 60)).toString().padStart(2,'0')
                    }
                }
            }

            SpinBox {
                id:spinBox
                Layout.alignment: Qt.AlignHCenter
                Layout.preferredHeight:35
                from: 0
                value: 60
                to: 60
                stepSize: 1
                editable: true
                onValueChanged: {
                    timerCanvas.setMinute = value
                    timerCanvas.requestPaint()
                }

                Keys.onPressed: {
                    if ( event.key === Qt.Key_Enter || event.key === Qt.Key_Return ) {
                        focus = false
                    }
                }
            }

            RowLayout {
                spacing : 10
                Layout.alignment: Qt.AlignHCenter
                Button {
                    Layout.preferredWidth: 40
                    Layout.preferredHeight:30
                    icon.name: "start"
                    icon.source: "qrc:/icon/start.png"
                    onClicked: {
                        windows.emit_Start()
                    }
                }
                Button {
                    Layout.preferredWidth: 40
                    Layout.preferredHeight:30
                    icon.name: "pause"
                    icon.source: "qrc:/icon/pause.png"
                    onClicked: {
                        windows.emit_Pause()
                    }
                }
                Button {
                    Layout.preferredWidth: 40
                    Layout.preferredHeight:30
                    icon.name: "reset"
                    icon.source: "qrc:/icon/reset.png"
                    onClicked: {
                        windows.emit_Stop()
                    }
                }
            }
        }
    }
}

ui를 좀 더 자세히 뜯어서 보겠습니다. Start / Pause / Stop Button을 클릭했을 때 Signal을 발생할 수 있게 Signal을 선언해 놨습니다.

Window {
    id:windows
    property int windowWidth : 300;
    property int windowHeight : 420;

    property double dOpacity: 1
    property bool bAlwaysOnTop : false
    
    opacity: dOpacity

    width: windowWidth
    height: windowHeight

    minimumWidth: windowWidth
    maximumWidth: windowWidth

    minimumHeight: windowHeight
    maximumHeight: windowHeight

    visible: true
    signal emit_Start();
    signal emit_Pause();
    signal emit_Stop();


UI들은 ColumnLayout과 RowLayout으로 배치해 주었습니다. 해당 Layout을 사용하기 위해서는 QtQuick.Layouts를 import 해주어야 합니다. 가장 상단에 있는 버튼에는 클릭 시 Q_INVOKABLE로 등록된 함수를 호출해주고 있습니다.

Item {
        anchors.fill: parent
        ColumnLayout {
            spacing : 10
            anchors.centerIn : parent
            Button {
                Layout.preferredWidth: 40
                Layout.preferredHeight:30
                Layout.alignment: Qt.AlignRight
                icon.name: "setting"
                icon.source: "qrc:/icon/setting.png"
                onClicked: {
                    timerMgr.showDialog()
                }
            }
		...
        }
            
    }

다음으로 메인인 시계 부분입니다. Canvas를 사용하였고 qml도 자바스크립트를 사용하기 때문에 자바스크립트 함수 사용이 가능했는데 덕분에 이전 예제에서 사용했던 코드를 그대로 사용할 수 있었습니다.

추가로 남은 시간을 그려주는 timerCanvas에는 function이 하나 있는데 이 함수 호출 시에 requestPaint 함수가 호출되어 paintEvent가 발생하게 됩니다. 이 rePaint 함수는 cpp에서 QMetaObject::invokeMethod를 통해 qml의 함수를 직접 호출하고 있습니다.

Rectangle {
    border.width: 1
    Layout.preferredWidth: 280
    Layout.preferredHeight:280

    Canvas {
        id:backgroundCanvas
        anchors.fill: parent
        property int centerX: parent.width / 2
        property int centerY: parent.height / 2
        property int radius : parent.width / 2 - 39
        property color backColor : "white"

        onPaint: {
            var ctx = backgroundCanvas.getContext("2d");
            ctx.beginPath()
            ctx.fillStyle = backColor
            ctx.arc(centerX, centerY, radius, 0, 2*Math.PI)
            ctx.fill()
            ctx.closePath()
        }
    }

    Canvas {
        id:timerCanvas
        objectName:"timeCanvas"
        anchors.fill: parent
        property int centerX: parent.width / 2
        property int centerY: parent.height / 2
        property int radius : parent.width / 2 - 41

        property int setMinute: 60
        property int setSecond: setMinute*60

        property color timeColor : "red"

        onPaint: {
            var time = setSecond;
            var end = (45-(time/60))*6;
            var ctx = timerCanvas.getContext("2d");
            ctx.reset()
            ctx.beginPath()
            ctx.fillStyle = timeColor
            ctx.moveTo(centerX,centerY);
            ctx.arc(centerX, centerY, radius, (Math.PI/180)*end, (Math.PI/180)*270);
            ctx.fill()
            ctx.closePath()
        }

        function rePaint() {
            timerCanvas.requestPaint()
        }
    }

    Canvas {
        id:clockNumber
        anchors.fill: parent

        property int centerX: parent.width / 2
        property int centerY: parent.height / 2

        onPaint: {
            var ctx = clockNumber.getContext("2d");
            ctx.font = "20px sans-serif";
            ctx.textAlign = "center";
            ctx.textBaseline = "middle";
            ctx.fillStyle = "black";
            ctx.beginPath()
            ctx.translate(centerX,centerY);
            for ( var number = 1; number <= 12; number++ ){
                var angle = (Math.PI / 180) * 30;
                ctx.rotate( angle );
                ctx.fillText( number, 0, -120);
            }
            ctx.closePath()
        }
    }

다음은 시간 잔량을 표시해 주는 부분입니다. 여기에는 padStart라는 남은 시간이 한 자리여도 2자리 수로 볼 수 있게 채워주는 padStart 함수가 있기에 따로 설명을 했습니다.

Rectangle {
    anchors.centerIn: parent
    opacity: 0.5
    width : 70
    height : 40
    Label {
        id:remainTime
        anchors.fill: parent
        horizontalAlignment: Text.AlignHCenter
        verticalAlignment: Text.AlignVCenter
        font.pixelSize: 15
        text : (parseInt(timerCanvas.setSecond / 60)).toString().padStart(2,'0')
               + ":" + (parseInt(timerCanvas.setSecond % 60)).toString().padStart(2,'0')
    }
}

마지막으로 Spinbox와 Button들입니다. spinbox는 말 그대로 시간을 설정해 주고 이 시간 값을 바꿀 때마다 시계를 갱신해 주기 위해서 timerCanvas에 requestPaint를 호출하게 됩니다.

spinbox는 editable property를 true로 설정해 Keyboard 입력이 가능하게 해 주었고 큰 Enter키(Qt.Key_Return), 작은 Enter키(Qt.Key_Enter)를 누르면 Focus를 해제시키게 하였습니다.

Button들에서는 signal을 날려주고 이 signal은 TimeTimerMgr에서 connect 되어 Slot함수를 호출하게 됩니다.

SpinBox {
    id:spinBox
    Layout.alignment: Qt.AlignHCenter
    Layout.preferredHeight:35
    from: 0
    value: 60
    to: 60
    stepSize: 1
    editable: true
    onValueChanged: {
        timerCanvas.setMinute = value
        timerCanvas.requestPaint()
    }

    Keys.onPressed: {
        if ( event.key === Qt.Key_Enter || event.key === Qt.Key_Return ) {
            focus = false
        }
    }
}

RowLayout {
    spacing : 10
    Layout.alignment: Qt.AlignHCenter
    Button {
        Layout.preferredWidth: 40
        Layout.preferredHeight:30
        icon.name: "start"
        icon.source: "qrc:/icon/start.png"
        onClicked: {
            windows.emit_Start()
        }
    }
    Button {
        Layout.preferredWidth: 40
        Layout.preferredHeight:30
        icon.name: "pause"
        icon.source: "qrc:/icon/pause.png"
        onClicked: {
            windows.emit_Pause()
        }
    }
    Button {
        Layout.preferredWidth: 40
        Layout.preferredHeight:30
        icon.name: "reset"
        icon.source: "qrc:/icon/reset.png"
        onClicked: {
            windows.emit_Stop()
        }
    }
}

다음으로 main 함수입니다. QQmlApplicationEngine을 관리 객체로 넘겨주고 있습니다.

#include <QGuiApplication>
#include <QQmlApplicationEngine>
#include <QQmlContext>
#include "TimeTimerMgr.h"

int main(int argc, char *argv[])
{
#if QT_VERSION < QT_VERSION_CHECK(6, 0, 0)
    QCoreApplication::setAttribute(Qt::AA_EnableHighDpiScaling);
#endif
    QGuiApplication app(argc, argv);
    QQmlApplicationEngine engine;

    const QUrl url(QStringLiteral("qrc:/TimeTimer.qml"));
    QObject::connect(&engine, &QQmlApplicationEngine::objectCreated, &app,
        [url](QObject *obj, const QUrl &objUrl) {
            if (!obj && url == objUrl)
                QCoreApplication::exit(-1);
        }
    , Qt::QueuedConnection);

    engine.load(url);

    TimeTimerMgr timerMgr;
    timerMgr.SetEngine(&engine);
    return app.exec();
}

다음으로 TimeTimerMgr 헤더 파일입니다. 여기에 설정 버튼을 클릭했을 때 호출할 Q_INVOKABLE 함수가 선언되어 있고 각 오브젝트들을 받을 수 있게 QObject 멤버와 QQuickWindows도 가지고 있습니다.

#ifndef TIMETIMERMGR_H
#define TIMETIMERMGR_H

#include <QObject>
#include <QTimer>
#include <QQmlApplicationEngine>
#include <QQmlContext>

#include "ConfigureDialog.h"


class TimeTimerMgr : public QObject
{
    Q_OBJECT
public:
    explicit TimeTimerMgr(QObject *parent = nullptr);
    ~TimeTimerMgr();

    void SetEngine(QQmlApplicationEngine *engine);
    void InitIteragte();

    Q_INVOKABLE void showDialog();

public slots:
    void Slot_Start();
    void Slot_Pause();
    void Slot_Stop();
    void Slot_Timeout();

    void Slot_GetColor(QColor color);
    void Slot_GetOpacity(double dOpacity);
    void Slot_GetAlwaysOnTop(bool bChecked);

signals:

private:
    ConfigureDialog* pDialog;
    QQmlApplicationEngine* m_engine;
    QQuickWindow* m_pWindow;
    QObject* m_pTimeCanvas;
    QTimer timer;
    int m_nTime;
    int m_nCount;
};

#endif // TIMETIMERMGR_H

다음으로 TimeTimerMgr cpp 코드입니다.

#include "TimeTimerMgr.h"
#include <QQmlProperty>

TimeTimerMgr::TimeTimerMgr(QObject *parent)
    : QObject{parent}
    , m_pDialog(NULL)
    , m_engine(NULL)
    , m_pWindow(NULL)
    , m_pTimeCanvas(NULL)
    , m_nTime(0)
    , m_nCount(0)
{
    connect(&timer, SIGNAL(timeout()), this, SLOT(Slot_Timeout()), Qt::UniqueConnection);
}

void TimeTimerMgr::showDialog()
{
    if ( m_pDialog != NULL ) { return; }
    m_pDialog = new ConfigureDialog(this, m_engine);

    connect(m_pDialog, SIGNAL(Emit_setColor(QColor)), this, SLOT(Slot_GetColor(QColor)), Qt::UniqueConnection);
    connect(m_pDialog, SIGNAL(Emit_setOpacity(double)), this, SLOT(Slot_GetOpacity(double)), Qt::UniqueConnection);
    connect(m_pDialog, SIGNAL(Emit_setAlwaysOnTop(bool)), this, SLOT(Slot_GetAlwaysOnTop(bool)), Qt::UniqueConnection);
    connect(m_pDialog, SIGNAL(Emit_Close()), this, SLOT(Slot_DialogClose()), Qt::UniqueConnection);

    TimerSetting settingValue;
    settingValue.color        = m_pTimeCanvas->property("timeColor").value<QColor>();
    settingValue.opacity      = m_pWindow->property("dOpacity").toDouble();
    settingValue.bAlwaysOnTop = m_pWindow->property("bAlwaysOnTop").toBool();

    m_pDialog->Show();
    m_pDialog->SetSettingValue(settingValue);
}

void TimeTimerMgr::Slot_Start()
{
    m_nTime = m_pTimeCanvas->property("setMinute").toInt();
    timer.start(1000);
}

void TimeTimerMgr::Slot_Pause()
{
    timer.stop();
}

void TimeTimerMgr::Slot_Stop()
{
    timer.stop();
    m_pTimeCanvas->setProperty("setSecond", (m_nTime*60));
    QMetaObject::invokeMethod(m_pTimeCanvas, "rePaint");
    m_nCount = 0;
}

void TimeTimerMgr::Slot_Timeout()
{
    m_nCount++;
    m_pTimeCanvas->setProperty("setSecond", (m_nTime*60-m_nCount));
    QMetaObject::invokeMethod(m_pTimeCanvas, "rePaint");

    if ( m_nTime*60 == m_nCount ) {
        timer.stop();
    }
}

void TimeTimerMgr::Slot_GetColor(QColor color)
{
    m_pTimeCanvas->setProperty("timeColor", color);
    QMetaObject::invokeMethod(m_pTimeCanvas, "rePaint");
}

void TimeTimerMgr::Slot_GetOpacity(double dOpacity)
{
    m_pWindow->setProperty("dOpacity", dOpacity);
}

void TimeTimerMgr::Slot_GetAlwaysOnTop(bool bChecked)
{
    m_pWindow->setProperty("bAlwaysOnTop", bChecked);

    m_pWindow->setFlag(Qt::WindowStaysOnTopHint, bChecked);
}

void TimeTimerMgr::Slot_DialogClose()
{
    m_pDialog = NULL;
}

TimeTimerMgr::~TimeTimerMgr()
{
    if ( m_pDialog != NULL ) {
        delete m_pDialog;
        m_pDialog = NULL;
    }
}

void TimeTimerMgr::SetEngine(QQmlApplicationEngine* engine)
{
    m_engine = engine;
    InitIteragte();
}

void TimeTimerMgr::InitIteragte()
{
    if ( m_engine == NULL ) { return; }
    m_engine->rootContext()->setContextProperty("timerMgr",this);
    QList<QObject*> objectList = m_engine->rootObjects();

    if ( objectList.count() < 1 ) { return; }
    m_pWindow = qobject_cast<QQuickWindow*>(objectList.value(0));

    if ( m_pWindow == NULL ) { return; }
    connect(m_pWindow, SIGNAL(emit_Start()), this, SLOT(Slot_Start()), Qt::UniqueConnection);
    connect(m_pWindow, SIGNAL(emit_Pause()), this, SLOT(Slot_Pause()), Qt::UniqueConnection);
    connect(m_pWindow, SIGNAL(emit_Stop()), this, SLOT(Slot_Stop()), Qt::UniqueConnection);

    m_pTimeCanvas = m_pWindow->findChild<QObject*>("timeCanvas");
}

여기도 함수를 좀 나눠서 살펴보겠습니다. main에서 engine을 따로 넘겨주고 있고 이 engine의 rootContext에 TimeTimeMgr 객체를 등록했습니다. 이로써 TimeTimer.qml에서 TimeTimerMgr의 Q_INVOKABLE 함수를 호출할 수 있게 됩니다. 그리고 버튼들을 클릭했을 때 발생하는 SIGNAL을 SLOT들과 connect 시켜줍니다.

void TimeTimerMgr::SetEngine(QQmlApplicationEngine* engine)
{
    m_engine = engine;
    InitIteragte();
}

void TimeTimerMgr::InitIteragte()
{
    if ( m_engine == NULL ) { return; }
    m_engine->rootContext()->setContextProperty("timerMgr",this);
    QList<QObject*> objectList = m_engine->rootObjects();

    if ( objectList.count() < 1 ) { return; }
    m_pWindow = objectList.value(0);

    if ( m_pWindow == NULL ) { return; }
    connect(m_pWindow, SIGNAL(emit_Start()), this, SLOT(Slot_Start()), Qt::UniqueConnection);
    connect(m_pWindow, SIGNAL(emit_Pause()), this, SLOT(Slot_Pause()), Qt::UniqueConnection);
    connect(m_pWindow, SIGNAL(emit_Stop()), this, SLOT(Slot_Stop()), Qt::UniqueConnection);

    m_pTimeCanvas = m_pWindow->findChild<QObject*>("timeCanvas");
}

다음으로 Slot 함수들입니다. Slot들을 통해 timeCanvas가 가지고 있는 property에 접근하고 있습니다. 추가로 AlwaysonTop 체크 여부는 받아 Window의 flag로 넘겨줍니다.

void TimeTimerMgr::Slot_Start()
{
    m_nTime = m_pTimeCanvas->property("setMinute").toInt();
    timer.start(1000);
}

void TimeTimerMgr::Slot_Pause()
{
    timer.stop();
}

void TimeTimerMgr::Slot_Stop()
{
    timer.stop();
    m_pTimeCanvas->setProperty("setSecond", (m_nTime*60));
    QMetaObject::invokeMethod(m_pTimeCanvas, "rePaint");
    m_nCount = 0;
}

void TimeTimerMgr::Slot_Timeout()
{
    m_nCount++;
    m_pTimeCanvas->setProperty("setSecond", (m_nTime*60-m_nCount));
    QMetaObject::invokeMethod(m_pTimeCanvas, "rePaint");

    if ( m_nTime*60 == m_nCount ) {
        timer.stop();
    }
}

void TimeTimerMgr::Slot_GetColor(QColor color)
{
    m_pTimeCanvas->setProperty("timeColor", color);
    QMetaObject::invokeMethod(m_pTimeCanvas, "rePaint");
}

void TimeTimerMgr::Slot_GetOpacity(double dOpacity)
{
    m_pWindow->setProperty("dOpacity", dOpacity);
}

void TimeTimerMgr::Slot_GetAlwaysOnTop(bool bChecked)
{
    m_pWindow->setProperty("bAlwaysOnTop", bChecked);
    m_pWindow->setFlag(Qt::WindowStaysOnTopHint, bChecked);
}

마지막으로 설정 Button을 클릭했을 때 Dialog를 띄우기 위한 함수입니다. property의 정보들을 Dialog에 넘겨주고 있습니다.

void TimeTimerMgr::showDialog()
{
    pDialog = new ConfigureDialog(this, m_engine);

    connect(pDialog, SIGNAL(Emit_setColor(QColor)), this, SLOT(Slot_GetColor(QColor)), Qt::UniqueConnection);
    connect(pDialog, SIGNAL(Emit_setOpacity(double)), this, SLOT(Slot_GetOpacity(double)), Qt::UniqueConnection);
    connect(pDialog, SIGNAL(Emit_setAlwaysOnTop(bool)), this, SLOT(Slot_GetAlwaysOnTop(bool)), Qt::UniqueConnection);

    TimerSetting settingValue;
    settingValue.color        = m_pTimeCanvas->property("timeColor").value<QColor>();
    settingValue.opacity      = m_pWindow->property("dOpacity").toDouble();
    settingValue.bAlwaysOnTop = m_pWindow->property("bAlwaysOnTop").toBool();

    pDialog->Show();
    pDialog->SetSettingValue(settingValue);
}

다음은 Dialog UI입니다. 버튼을 클릭하면 Window가 띄워지고 해당 UI에는 Timer 색상 설정을 위한 Button과 AlwaysOnTop을 위한 Switch, 마지막으로 투명도 설정을 위한 Slidebar가 있습니다.

여기에선 colorDialog가 사용되고 있고 colorDialog 확인 버튼 클릭 시 onAccepted가 호출되게 됩니다. 그리고 signal들은 ConfigureDialog 객체를 통해 TimeTimerMgr로 전달되고 Time Time.qml의 Property가 설정됩니다.

import QtQuick 2.15
import QtQuick.Window 2.15
import QtQuick.Controls 2.15
import QtQuick.Layouts 1.15
import QtQuick.Dialogs 1.3

Window {
    id : settingDlg
    property int winWidth : 200
    property int winHeight : 240

    property color backColor : "black"
    property double dOpacity: 1
    property bool bAlwaysOnTop : false

    width: winWidth
    height: winHeight

    minimumWidth: winWidth
    minimumHeight: winHeight

    maximumWidth: winWidth
    maximumHeight: winHeight

    signal emit_changeColor(color back);
    signal emit_changeOpcaity(double dOpacity);
    signal emit_changeAlwaysOnTop(bool bChecked);

    GridLayout {
        anchors.fill: parent
        anchors.centerIn: parent
        columnSpacing: 0
        columns : 2

        Layout.alignment: Qt.AlignCenter

        property int nWidth : 50
        property int nHeight : 30

        Label {
            Layout.preferredWidth: parent.nWidth
            Layout.preferredHeight: parent.nHeight
            Layout.alignment: Qt.AlignVCenter | Qt.AlignRight
            text : "타이머 색상"
            verticalAlignment: Text.AlignVCenter
            horizontalAlignment: Text.AlignHCenter
        }

        Button {
            id : colorBtn
            Layout.preferredWidth: parent.nWidth
            Layout.preferredHeight: parent.nHeight
            Layout.alignment: Qt.AlignCenter
            background: Rectangle {
                color: backColor
            }
            onClicked: {
                colorDialog.open()
            }
        }

        Label {
            text : "상단 고정"
            Layout.preferredWidth: parent.nWidth
            Layout.preferredHeight: parent.nHeight
            Layout.alignment: Qt.AlignVCenter | Qt.AlignRight
            verticalAlignment: Text.AlignVCenter
            horizontalAlignment: Text.AlignHCenter
        }

        Switch {
            Layout.preferredWidth: parent.nWidth
            Layout.preferredHeight: parent.nHeight
            Layout.alignment: Qt.AlignCenter
            checked: bAlwaysOnTop
            onCheckedChanged: {
                settingDlg.emit_changeAlwaysOnTop(checked)
            }
        }

        Label {
            text : "투명도"
            Layout.preferredWidth: parent.nWidth
            Layout.preferredHeight: parent.nHeight
            Layout.alignment: Qt.AlignVCenter | Qt.AlignRight
            verticalAlignment: Text.AlignVCenter
            horizontalAlignment: Text.AlignHCenter
        }

        Slider {
            from:1
            to:0
            stepSize: 0.1
            value : dOpacity
            Layout.preferredWidth: parent.nWidth + 20
            Layout.preferredHeight: parent.nHeight
            Layout.alignment: Qt.AlignCenter

            onValueChanged: {
                console.log(value)
                settingDlg.emit_changeOpcaity(value)
            }
        }
    }

    ColorDialog {
        id:colorDialog
        modality: Qt.WindowModal
        title:"Timer Color"
        color:backColor
        onAccepted: {
            backColor = colorDialog.color
            settingDlg.emit_changeColor(backColor)
        }
    }
}

Dialog를 띄우기 위한 ConfigureDialog 객체입니다. 여기서는 QQuickWindow를 멤버로 가지고 있습니다.

#ifndef CONFIGUREDIALOG_H
#define CONFIGUREDIALOG_H

#include <QObject>
#include <QQuickWindow>
#include <QQmlApplicationEngine>

typedef struct _TimerSetting {
    QColor color;
    double opacity;
    bool bAlwaysOnTop;

    _TimerSetting() {
        color.setRgb(0,0,0);
        opacity = 0;
        bAlwaysOnTop = false;
    }
} TimerSetting;

class ConfigureDialog : public QObject
{
    Q_OBJECT
public:
    explicit ConfigureDialog(QObject *parent = nullptr, QQmlApplicationEngine* engine= NULL);
    ~ConfigureDialog();
    void Show();
    void SetSettingValue(TimerSetting& setValue);
signals:
    void Emit_setColor(QColor color);
    void Emit_setOpacity(double dOpacity);
    void Emit_setAlwaysOnTop(bool bChecked);

public slots:
    void Slot_GetColor(QColor color);
    void Slot_GetOpacity(double dOpacity);
    void Slot_GetAlwaysOnTop(bool bChecked);

private:
    QQuickWindow* m_pView;
    QQmlApplicationEngine* m_pEngine;
};

#endif // CONFIGUREDIALOG_H

ConfigureDialog의 cpp입니다. 다른 qml을 윈도우처럼 띄우기 위해 Component를 생성하였고 그 component를 QQuickWindow로 받아 띄워주게 됩니다.

#include "ConfigureDialog.h"
#include <QQmlComponent>
#include <QQmlContext>

ConfigureDialog::ConfigureDialog(QObject *parent, QQmlApplicationEngine *engine)
    : QObject{parent}
    , m_pView(NULL)
    , m_pEngine(engine)
{
    m_pView = new QQuickWindow();
}

void ConfigureDialog::Show()
{
    if ( m_pView == NULL ) { return; }

    QQmlComponent comp(m_pEngine, QUrl(QStringLiteral("qrc:/SettingDialog.qml")));
    m_pView = qobject_cast<QQuickWindow*>(comp.create(m_pEngine->rootContext()));
    connect(m_pView, SIGNAL(emit_changeColor(QColor)), this, SLOT(Slot_GetColor(QColor)), Qt::UniqueConnection);
    connect(m_pView, SIGNAL(emit_changeOpcaity(double)), this, SLOT(Slot_GetOpacity(double)), Qt::UniqueConnection);
    connect(m_pView, SIGNAL(emit_changeAlwaysOnTop(bool)), this, SLOT(Slot_GetAlwaysOnTop(bool)), Qt::UniqueConnection);

    m_pEngine->rootContext()->setContextProperty("contorlDlg",this);

    m_pView->show();
}

void ConfigureDialog::SetSettingValue(TimerSetting &setValue)
{
    m_pView->setProperty("backColor", setValue.color);
    m_pView->setProperty("dOpacity", setValue.opacity);
    m_pView->setProperty("bAlwaysOnTop", setValue.bAlwaysOnTop);
}

void ConfigureDialog::Slot_GetColor(QColor color)
{
    emit Emit_setColor(color);
}

void ConfigureDialog::Slot_GetOpacity(double dOpacity)
{
    emit Emit_setOpacity(dOpacity);
}

void ConfigureDialog::Slot_GetAlwaysOnTop(bool bChecked)
{
    emit Emit_setAlwaysOnTop(bChecked);
}

ConfigureDialog::~ConfigureDialog()
{
    if ( m_pView != NULL ) {
        delete m_pView;
        m_pView = NULL;
    }
}

색상 값을 변경하면 자동으로 시계의 색상이 변경되게 됩니다.

풀 코드는 아래 Github 링크에서 확인하실 수 있습니다.


GitHub - psy1064/TimeTimer_Qt: TimeTimer Use Qt/QML

TimeTimer Use Qt/QML. Contribute to psy1064/TimeTimer_Qt development by creating an account on GitHub.

github.com

다른 기능이 추가된 아래 링크도 참고하시면 좋습니다.


[Qt] QML(8) - SoundEffect, ComboBox ListModel 적용

이전 포스팅에서 ListView에 아이템을 QAbstractModel을 상속받은 클래스를 통해 동적으로 관리하는 예제를 진행해봤습니다. [Qt] QML(7) - ListView/Model C++ 로 처리하기 이전 포스팅에서 ListView를 QML로 보여

1d1cblog.tistory.com


728x90
728x90

Qt Widget Application Project에서는 ui 파일에서 ui를 배치하고 c++ 코드에서 그 ui에 접근하여 수정하기도 했습니다. 그리고 c++ 코드에서 동적으로 UI를 배치할 수도 있었습니다.

Qt Quick에서도 C++과 QML 사이에 주고받을 수 있는 방법이 여러 존재하는데 그에 대해 알아보려 합니다. 간단히 계산기 예제를 통해서 알아보겠습니다.


먼저 property를 이용한 방법입니다. qml 파일을 간단히 두 숫자를 계산하고 결과를 보여주는 ui로 구성하였습니다.

import QtQuick 2.15
import QtQuick.Window 2.15
import QtQuick.Controls 2.15

Window {
    visible: true
    width : 650
    height: 200
    title: qsTr("Object Demo")
    property int nwidth : 100;

    Item {
        anchors.fill: parent
        Row {
            anchors.centerIn: parent
            spacing : 20
            TextField {
                id : number1
                width : nwidth
                validator: IntValidator {}
                onTextChanged: {
                    PropertyControl.number1 = parseInt(number1.text)
                }
            }
            ComboBox {
                id : combo
                width : nwidth
                model : ["+","-","x","/"]

                onCurrentTextChanged: {
                    PropertyControl.sOP = combo.currentText
                }
            }
            TextField {
                id : number2
                width : nwidth
                validator: IntValidator {}
                onTextChanged: {
                    PropertyControl.number2 = parseInt(number2.text)
                }
            }
            Rectangle {
                width : 30
                height : number1.height
                border.width: 1
                Label {
                    anchors.fill: parent
                    text:" = "
                    horizontalAlignment: Text.AlignHCenter
                    verticalAlignment: Text.AlignVCenter
                }
            }
            Rectangle {
                width : nwidth
                height : number1.height
                border.width: 1
                Label {
                    anchors.fill: parent
                    text : PropertyControl.result
                    horizontalAlignment: Text.AlignHCenter
                    verticalAlignment: Text.AlignVCenter
                }
            }
        }
    }
}

QObject를 상속받는 객체를 하나 만들어줍니다. 이 객체를 통해 Property를 관리하고 qml에서 Propertycontrol 객체의 데이터를 쓰고 읽을 수 있습니다.

#ifndef PROPERTYCONTROL_H
#define PROPERTYCONTROL_H

#include <QObject>

class PropertyControl : public QObject
{
    Q_OBJECT
    Q_PROPERTY(int number1 WRITE SetNumber1)
    Q_PROPERTY(int number2 WRITE SetNumber2)
    Q_PROPERTY(QString sOP WRITE SetOp)
    Q_PROPERTY(int result READ GetResult NOTIFY ResultChanged)

public:
    explicit PropertyControl(QObject *parent = nullptr);

    void SetNumber1(int& nNum);
    void SetNumber2(int& nNum);
    void SetOp(QString& sOP);

    int GetResult();
signals:
    void ResultChanged();

private:
    int m_nResult;
    int m_nNumber1;
    int m_nNumber2;
    QString m_sOP;
};

#endif // PROPERTYCONTROL_H
#include "PropertyControl.h"
#include <QDebug>

PropertyControl::PropertyControl(QObject *parent)
    : QObject{parent}
    , m_nResult(0)
    , m_nNumber1(0)
    , m_nNumber2(0)
    , m_sOP("")
{
}

void PropertyControl::SetNumber1(int& nNum) {
    m_nNumber1 = nNum;
    emit ResultChanged();
}

void PropertyControl::SetNumber2(int& nNum) {
    m_nNumber2 = nNum;
    emit ResultChanged();
}

void PropertyControl::SetOp(QString& sOP) {
    m_sOP = sOP;
    emit ResultChanged();
}

int PropertyControl::GetResult() {
    if ( m_sOP == "+" ) {
        m_nResult = m_nNumber1 + m_nNumber2;
    } else if ( m_sOP == "-" ) {
        m_nResult = m_nNumber1 - m_nNumber2;
    } else if ( m_sOP == "x" ) {
        m_nResult = m_nNumber1 * m_nNumber2;
    } else if ( m_sOP == "/" ) {
        if ( m_nNumber2 == 0 ) { return 0; }
        m_nResult = m_nNumber1 / m_nNumber2;
    } else {
        return 0;
    }
    return m_nResult;
}

그리고 이 Propertycontrol 객체를 생성 후 engine의 rootContext에 등록해 줍니다.

#include <QGuiApplication>
#include <QQmlApplicationEngine>
#include <QQmlContext>
#include "PropertyControl.h"

int main(int argc, char *argv[])
{
#if QT_VERSION < QT_VERSION_CHECK(6, 0, 0)
    QCoreApplication::setAttribute(Qt::AA_EnableHighDpiScaling);
#endif
    QGuiApplication app(argc, argv);

    QQmlApplicationEngine engine;
    PropertyControl control;
    engine.rootContext()->setContextProperty("PropertyControl",&control);

    const QUrl url(QStringLiteral("qrc:/main.qml"));
    QObject::connect(&engine, &QQmlApplicationEngine::objectCreated, &app,
        [url](QObject *obj, const QUrl &objUrl) {
            if (!obj && url == objUrl)
                QCoreApplication::exit(-1);
        }
    , Qt::QueuedConnection);

    engine.load(url);
    return app.exec();
}

위 코드를 하나씩 보겠습니다. Propertycontrol 객체에는 Q_OBJECT가 선언되어 있고 그 밑으로 qml과 c++간 주고받을 property가 선언되어 있습니다. qml에서 해당 property에 값을 넣을 때는 WRITE 뒤에 명시된 함수가 호출되고 property의 값을 읽을 때는 READ 함수를 이용합니다.

Q_OBJECT
Q_PROPERTY(int number1 WRITE SetNumber1)
Q_PROPERTY(int number2 WRITE SetNumber2)
Q_PROPERTY(QString sOP WRITE SetOp)
Q_PROPERTY(int result READ GetResult NOTIFY ResultChanged)

아래 오브젝트를 보면 TextField에서 값이 변경되면 main에서 전달된 Propertycontrol 객체의 number1에 값을 넣어주고 있습니다.

TextField {
    id : inputNumber1
    width : nwidth
    validator: IntValidator {}
    onTextChanged: {
        PropertyControl.number1 = parseInt(inputNumber1.text)
    }
}
engine.rootContext()->setContextProperty("PropertyControl",&control);

이때 Q_PROPERTY에 number1의 WRITE 함수를 SetNumber1으로 등록했기 때문에 SetNumber1이 호출될 것입니다.

Q_PROPERTY(int number1 WRITE SetNumber1)

void PropertyControl::SetNumber1(int& nNum) {
    m_nNumber1 = nNum;
    qDebug() << "number1 Changed";
    emit ResultChanged();
}

이렇게 TextField와 Combobox는 WRITE 시에 해당 함수를 타게 됩니다. 

계산 결과를 보여주는 result 변수는 Label에서 text로 지정해놓고 있습니다. 한번 Property 지정을 해놓고 다른 코드에서는 이 Label의 Text를 건드리지 않고 있습니다.

Rectangle {
    width : nwidth
    height : inputNumber1.height
    border.width: 1
    Label {
        anchors.fill: parent
        text : PropertyControl.result
        horizontalAlignment: Text.AlignHCenter
        verticalAlignment: Text.AlignVCenter
    }
}

이때 이 result를 READ 하고 있는 Q_PROPERTY에 등록된 NOTIFY signal을 이용해야 합니다. 위 코드에서 봤듯이 숫자나 연산자를 변경하였을 때 결과 값을 바로 경신할 수 있게 emit을 날려주고 있습니다. 

Q_PROPERTY(int number1 WRITE SetNumber1)

void PropertyControl::SetNumber1(int& nNum) {
    m_nNumber1 = nNum;
    qDebug() << "number1 Changed";
    emit ResultChanged();
}

만약 이 Emit을 없앤다면 Label에 result에 대해 Read 하지 않아 갱신이 되지 않습니다.

qml에서 C++ 함수를 직접적으로 호출할 수 있습니다. C++의 객체에서 Q_INVOKABLE로 선언된 함수는 호출이 가능합니다.

Button {
    width : nwidth
    height : inputNumber1.height
    text : "QDebug"
    onClicked: {
        PropertyControl.showlogResult()
    }
}
#ifndef PROPERTYCONTROL_H
#define PROPERTYCONTROL_H

#include <QObject>

class PropertyControl : public QObject
{
    Q_OBJECT
    Q_PROPERTY(int number1 WRITE SetNumber1)
    Q_PROPERTY(int number2 WRITE SetNumber2)
    Q_PROPERTY(QString sOP WRITE SetOp)
    Q_PROPERTY(int result READ GetResult NOTIFY ResultChanged)

public:
    explicit PropertyControl(QObject *parent = nullptr);

    void SetNumber1(int& nNum);
    void SetNumber2(int& nNum);
    void SetOp(QString& sOP);

    int GetResult();

    Q_INVOKABLE void showlogResult()
    {
        qDebug() << "Result = " << m_nResult;
    }
signals:
    void ResultChanged();

private:
    int m_nResult;
    int m_nNumber1;
    int m_nNumber2;
    QString m_sOP;
};

#endif // PROPERTYCONTROL_H

마지막으로 SIGNAL을 이용한 방법입니다. 오브젝트 안에 signal을 등록하고 버튼을 클릭했을 때 해당 signal을 발생하게 만들었습니다.

Item {
    id : item
    objectName: "item"
    anchors.fill: parent
    signal sigDebug();
    Button {
        width : nwidth
        height : inputNumber1.height
        text : "QDebug"
        onClicked: {
            item.sigDebug()
        }
    }
}

해당 Signal을 QObject를 상속받는 객체와 connect를 시켜줍니다.

{
	...
    
    QObject* pWindow = engine.rootObjects().value(0);
    QObject* pObject = pWindow->findChild<QObject*>("item");
    if ( pObject != NULL ) {
        QObject::connect(pObject, SIGNAL(sigDebug()),&control, SLOT(Slot_ShowDebug()));
    }
    
}
#ifndef PROPERTYCONTROL_H
#define PROPERTYCONTROL_H

#include <QObject>

class PropertyControl : public QObject
{
    Q_OBJECT
    Q_PROPERTY(int number1 WRITE SetNumber1)
    Q_PROPERTY(int number2 WRITE SetNumber2)
    Q_PROPERTY(QString sOP WRITE SetOp)
    Q_PROPERTY(int result READ GetResult NOTIFY ResultChanged)

public:
    explicit PropertyControl(QObject *parent = nullptr);

    void SetNumber1(int& nNum);
    void SetNumber2(int& nNum);
    void SetOp(QString& sOP);

    int GetResult();

signals:
    void ResultChanged();

public slots:
    void Slot_ShowDebug()
    {
        qDebug() << m_nResult;
    }

private:
    int m_nResult;
    int m_nNumber1;
    int m_nNumber2;
    QString m_sOP;
};

#endif // PROPERTYCONTROL_H
728x90

+ Recent posts

Buy Me A Coffee